Example: Record User Signups with Sailthru JS and Google Tag Manager
This page offers an example implementation of the JavaScript Library‘s userSignUp call. Your requirements and preferred method for implementing the function may vary. For more information, see the function documentation.
This example shows how to use Google Tag Manager variables with a userSignUp call to capture the values of a form used for user signups. In the example, we use Google Tag Manager to listen for events on a button click and submit the form using an AJAX request in jQuery. This example requires that you have followed the instructions to Add the JavaScript Tag and implemented the Additional Code for Function Examples or your own event handler.1. Create an HTML Form
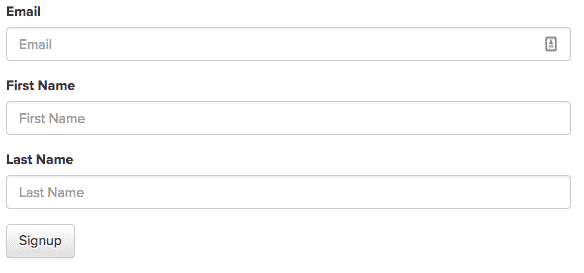
Include the following code on your site. Notice that the id attributes will match variables in Google Tag Manager that will get the value of the associated form field.
<form id="sailthru-form-ajax" class="sailthru-ajax">
   <div class="form-group">
       <label for="inputEmail">Email</label>
       <input type="email" class="form-control" id="st-signup-ajax-email" placeholder="Email">
   </div>
   <div class="form-group">
       <label for="inputPassword">First Name</label>
       <input type="text" class="form-control" id="st-signup-ajax-first-name" placeholder="First Name">
   </div>
   <div class="form-group">
       <label for="inputPassword">Last Name</label>
       <input type="text" class="form-control" id="st-signup-ajax-last-name" placeholder="Last Name">
   </div>
   <button type="button" class="btn btn-default ajax" id="sailthru-signup-ajax">Signup</button>
</form>
2. Use Variables to Capture Form Field Values
Google Tag Manager allows you to set one or more variables which you can use in a tag. This is a useful way of capturing the value of a form field when using an AJAX form, like our example above. Below, we will create variables to capture the email, first name, and last name submitted in the form.- In Google Tag Manager select Variables from the navigation menu in your workspace.
- Under User Defined Variables, click New.
- At the top-left, rename the variable to st-signup-ajax-email.
- Click within the Variable Configuration box, then select the variable type Custom JavaScript.
- Under Choose variable type, select Custom Javascript. A field is displayed where you can enter code to determine the value of this variable.
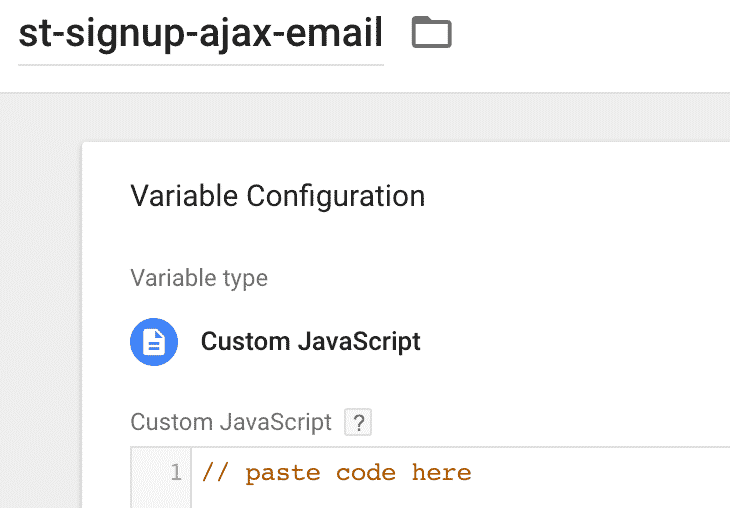
- Paste the following code, which will allow us to select the email value from the form field.
This code first sets a variable called form to select the form you are working with. You’ll notice in the HTML form in the previous section has an id of sailthru-form-ajax. This id is used here to select the form.function() { var form = document.querySelector('#sailthru-form-ajax'); var field = form.querySelector('#st-signup-ajax-email'); return field ? field.value : undefined; } - Repeat this process and create two new custom variables to match your field IDs for first name and last name.
- Copy and paste the following code into another new custom variable saved as st-signup-ajax-first-name.
function() { var form = document.querySelector('#sailthru-form-ajax'); var field = form.querySelector('#st-signup-ajax-first-name'); return field ? field.value : undefined; } - Copy and paste the following code into another new custom variable and save it as st-signup-ajax-last-name.
function() {
 var form = document.querySelector('#sailthru-form-ajax');
 var field = form.querySelector('#st-signup-ajax-last-name');
 return field ? field.value : undefined;
}
3. Add userSignUp Function as a Tag, Include Variables, and Set Trigger
- In Google Tag Manager, click New Tag, then change the tag’s name from “Untitled Tag” to “Sailthru – userSignUp”.
- Click Tag Configuration, then select the tag type Custom HTML, which allows HTML and/or JavaScript code.
- Copy the code sample below and paste it into the HTML box.
You’ll notice that the values of the parameters that are surrounded in parentheses match the custom variables you just created. Google Tag Manager will execute the custom JavaScript you wrote to capture the values of the form fields and replace these values.
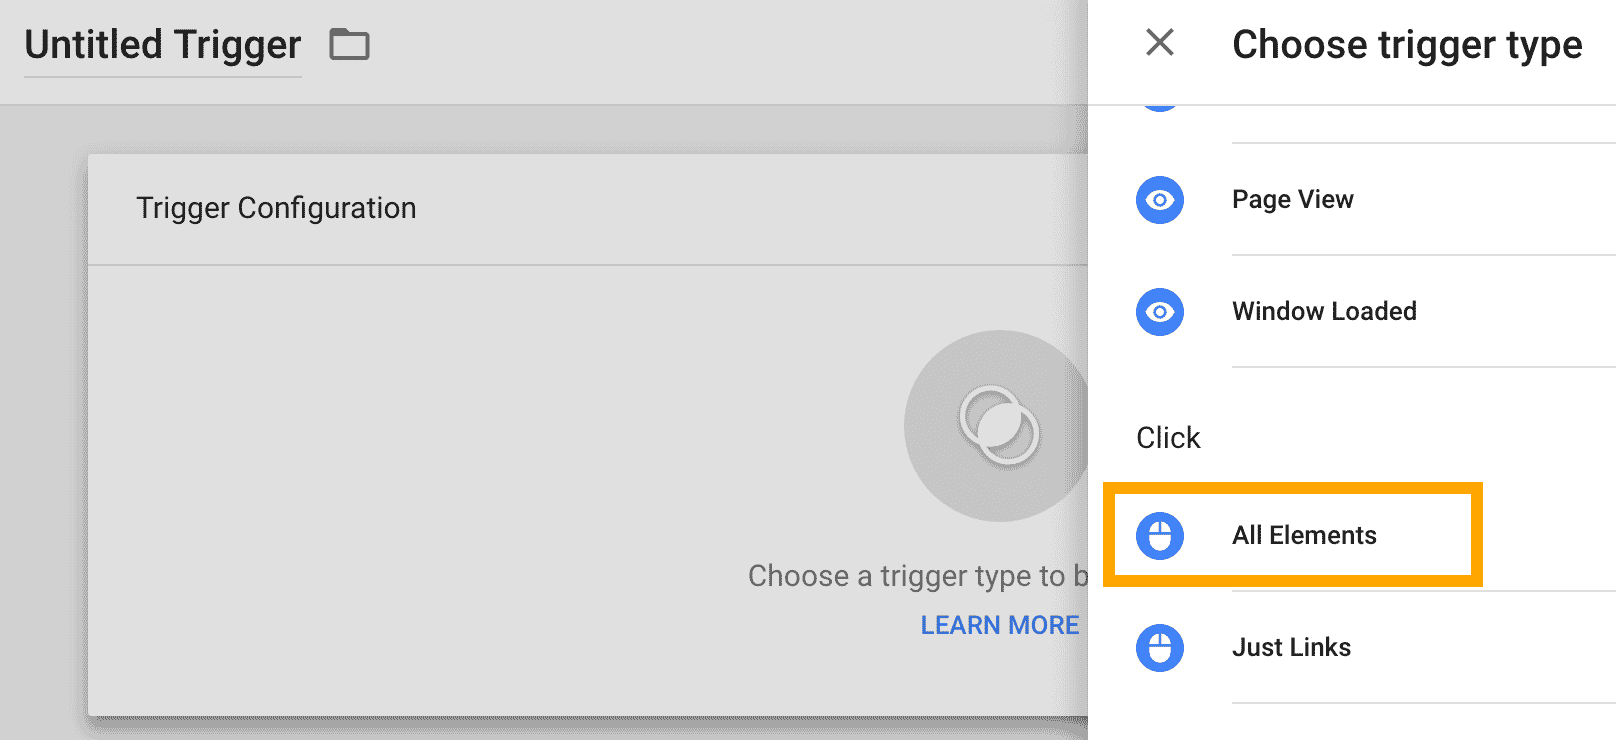
<script type="text/javascript"> Sailthru.integration('userSignUp', { email: "{{st-signup-ajax-email}}", vars: { signup_date: 'today', first_name: "{{st-signup-ajax-first-name}}", last_name: "{{st-signup-ajax-last-name}}" }, source: 'web', lists: { Main: 1, SignupTest: 1 }, onSuccess: function() { displayMessage('User Added', 'Added to Sailthru, check that profile.'); }, onError: function() { displayMessage('Error', 'Something went wrong there, check the console'); } }); </script> - Scroll down below the HTML field and click within the Triggering box to add a new trigger, so that Google Tag Manager knows when to fire the tag.
- At the top-right, click
 to add a new trigger.
 - Click the Trigger Configuration box, then select the trigger type All Elements.
- Remember those IDs that you set on the HTML elements? Now’s the time to use the button and its ID to trigger the firing of the tag. We will instruct Google Tag Manager to listen for any click events that happen on a HTML element with an id of sailthru-signup-ajax (your form button).
- Under This trigger fires on, select Some Clicks.
- Select the options Click ID and contains, and enter the ID sailthru-signup-ajax in the last field.
- You can optionally give your new trigger a name in the top-left corner.
- Click Save.