Custom Audiences Integration Setup
Contents
Configuration Steps for Facebook Business Admin or Ad Account Admin
Each user can connect their account to a single Facebook Ad Account. As a Facebook Business or Ad Account admin, complete the following steps to prepare one or more users to push data to a specific Facebook Ad Account.
A Facebook best practice is to use Facebook Business Manager to manage ad accounts. These instructions therefore offer steps that utilize the Business Manager tool.
1. Access Ad Account Settings
- Accept the Business Manager Terms of Service by clicking this link from within Facebook Business Manager:
https://business.facebook.com/ads/manage/customaudiences/tos/?act=<ad_account_id> - In Facebook Business Manager, click the top-left menu button and select Business Manager Settings.
- In the left-navigation menu, click the Ad Accounts icon
 and select the Ad Account name.
Keep this screen open for the next two sections, below.
and select the Ad Account name.
Keep this screen open for the next two sections, below.
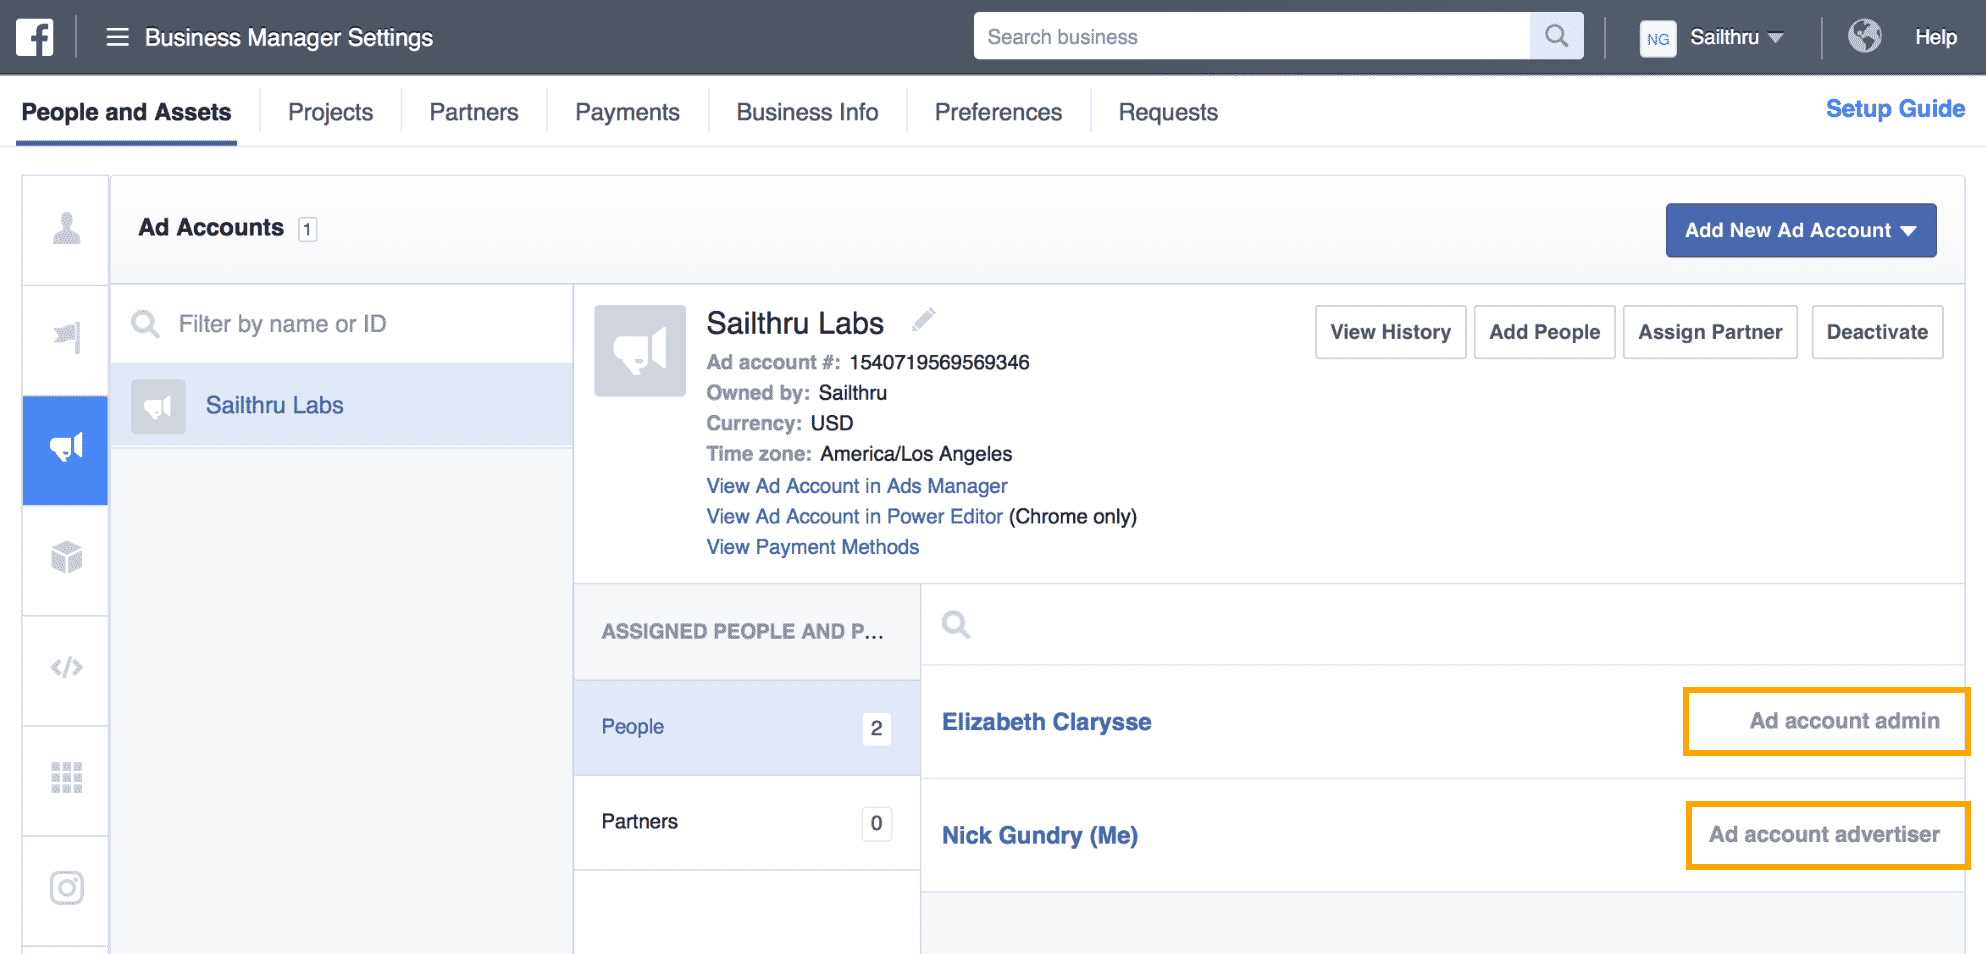
2. Confirm Ad Account Permissions
To pass data, the Facebook user must have the Admin or Advertiser permission in Facebook Business Manager to manage Facebook Ads for the specific ad account they will be using.
If you are connecting your own account to an ad account for which you already have Admin permissions, you can skip to the next section. Otherwise, to confirm that a user is an admin or advertiser for an ad account:
- In the Facebook Business Manager Ad Accounts section, with the ad account name
selected, users and their permissions are listed in the Assigned People and Partners
section. Confirm that the user is an Admin or Advertiser.
Note: Facebook requires that users agree to the corporate Terms of Service for Custom Audiences. Each advertiser/admin may be prompted to do this the first time they create a Custom Audience. While you may have already agreed to similar terms on a personal Facebook account, this may need to be completed again under Business Manager.
3. Copy the Ad Account ID
With the ad account opened in Business Manager Settings, copy the Ad account #.
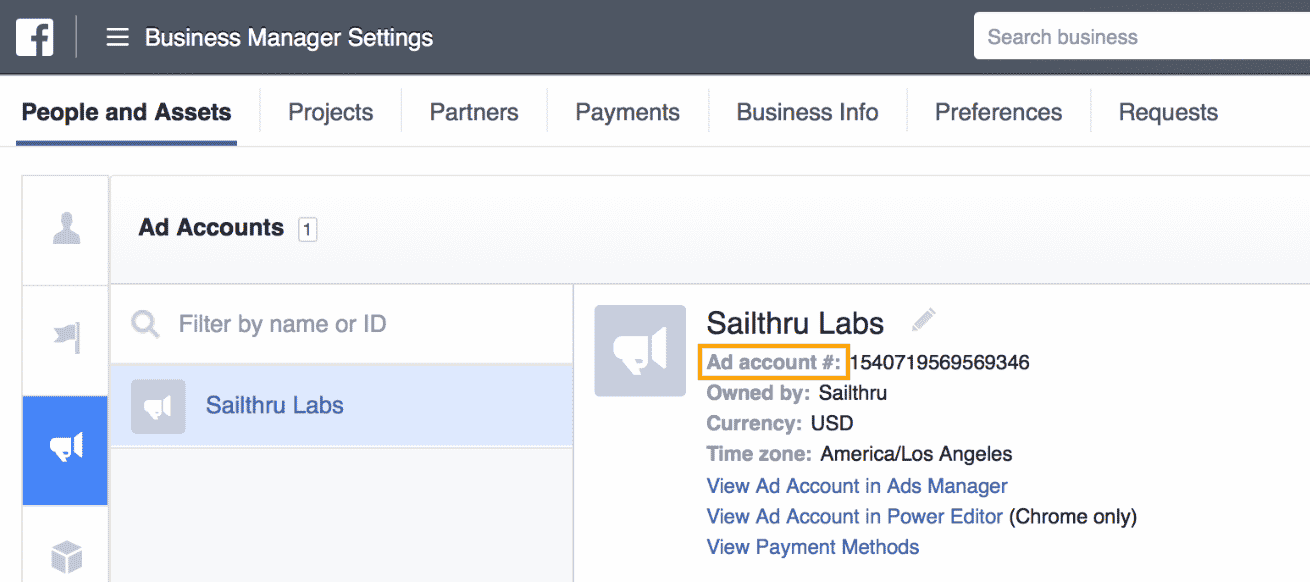
If you will be sending user data from your account to this ad account, save this account number for use in the next section, "User Configuration Steps." If another user will be linking their account to this Facebook Ads account, send them the ad account number with a request to complete the "User Configuration Steps" below.
Accepting Terms of Service
There are two places that you may need to accept the Terms of Service (ToS), otherwise your Facebook Custom Audience jobs may fail. You may need to accept the ToS in potentially two places:- At the ad account level
- At the audience level
- Find the Ad Account ID (may already be in their Integrations settings)
- Provide the following URL with the relevant Ad Account ID.
If you already accepted the latest ToS, the page will note the ToS has been accepted.https://business.facebook.com/ads/manage/customaudiences/tos/?act=
- In Facebook Business Manager, click on the menu.
- Under Assets, click on Audiences

- When viewing the Audiences, there is an Availability column that should say the audiences are available or it requests an action, like accepting ToS.
- Make sure to accept ToS on all audiences so the Audience is available to update.
User Configuration Steps
These one-time setup instructions will enable you to push user data from your account to a specified Facebook Ads account. You will need the Facebook ad account number and permissions as an advertiser or admin on that Facebook Ads account. (For more information on these requirements, see the previous section, "Facebook Business Admin or Ad Account Admin Configuration.")
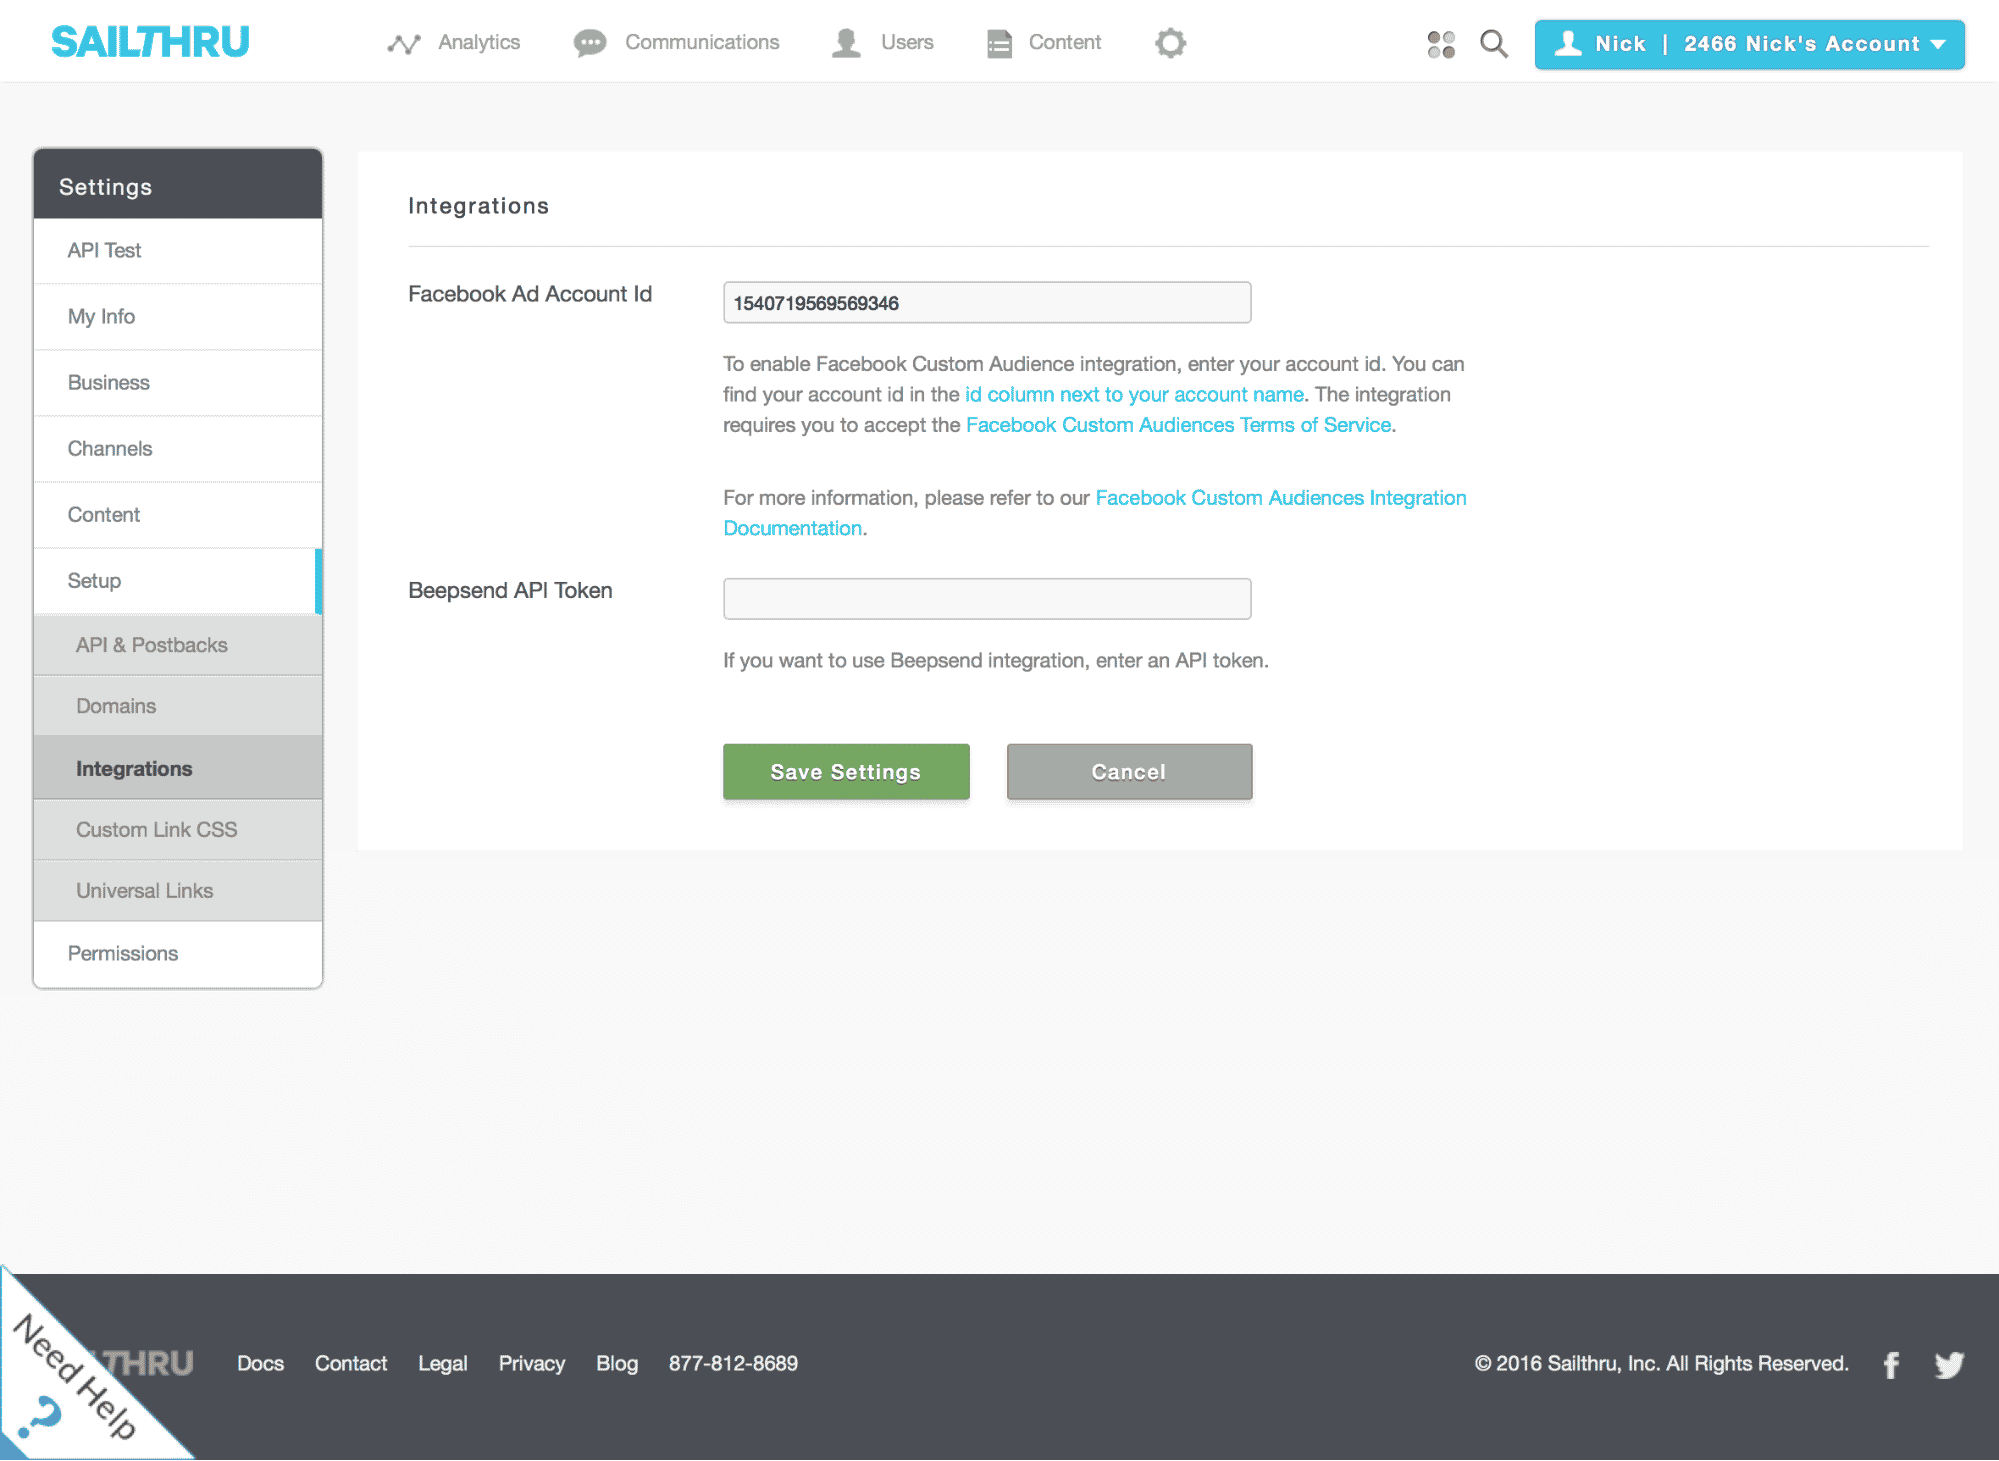
1. Enter the Facebook Ad Account Number
In the UI, go to the Settings page, and under Setup, select Integrations. Paste the Ad Account number into the Facebook Ad Account Id box.
2. Test a List Export and Approve Permission Requests
In your Engage by Sailthru account, go to the Lists page and look for a list with 20 or more users. It can be a smart list or natural list. You can also create a new list for this purpose if needed.
Click the cloud icon on the right end of the list's row and choose Facebook Custom Audiences.
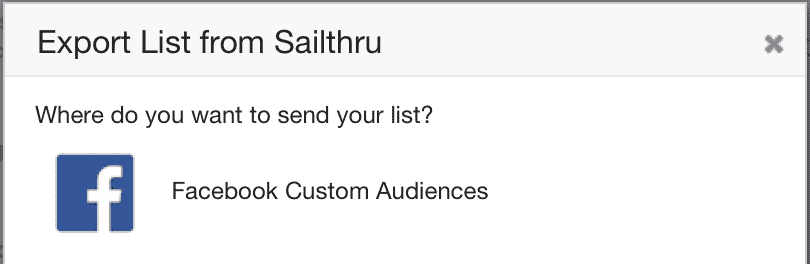
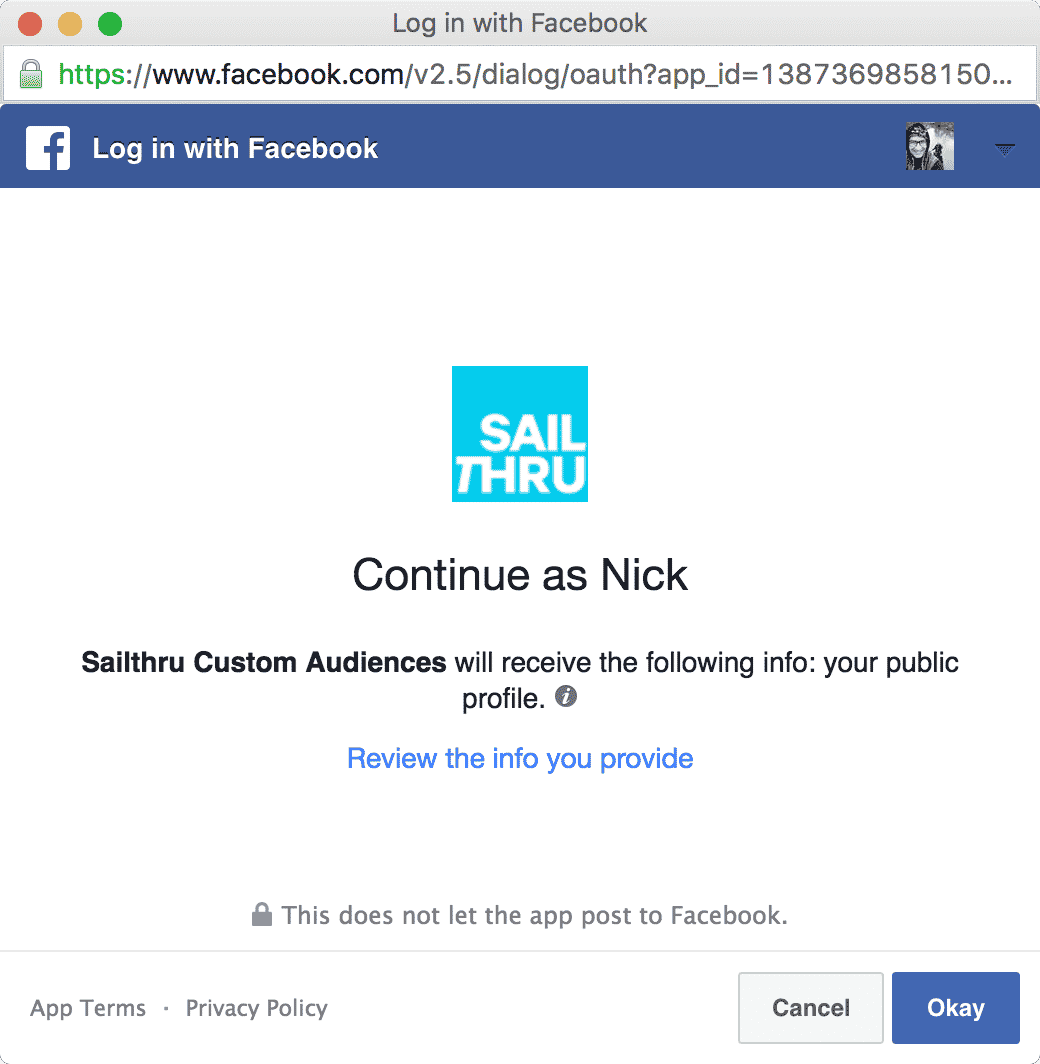
The first time you export a list, a popup window is triggered. You are asked to give the Custom Audiences app permissions to access your public profile and manage your ads. This step is required to be able to push user data into your account. Click Okay.
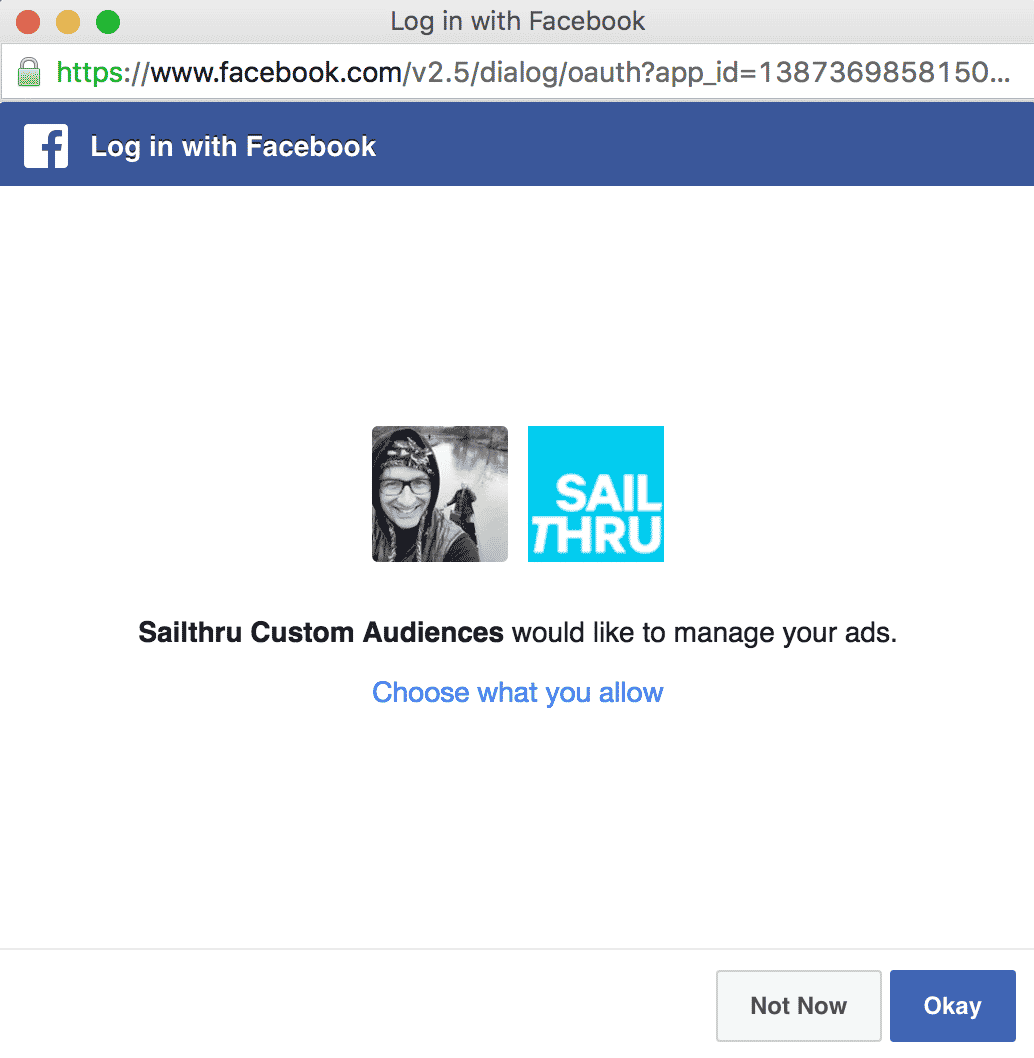
You are then presented with a second screen, on which you will need to confirm access to manage ads in your Facebook account by clicking Okay.
You're all set. If there are no error messages, you have successfully connected your Facebook Ads account. If you do see an error message please confirm that you have entered the correct ad account ID in Engage by Sailthru and that you have advertiser or admin permissions on that ad account (per the section above, "Facebook Business or Ad Account Admin Steps"). If you need assistance, please reach out to support@sailthru.com who will be able to help.
Reset Facebook User for Custom Audience
- Navigate to the Lists page. (Users > Lists)
- Open the Console in the browser Developer Tools:
- Right click, then click inspect, then click the Console tab.
- In the Console, type FB.logout() and press enter.
- The next line should be undefined.
- Close the Developer Tools and refresh the page.
- Try creating the Custom Audience again.
Lost Access to Ad Account Group
If you have previously set up the connection between Engage by Sailthru and Facebook Custom Audiences, but now are receiving a "Your Facebook account does not have access to the Ad Account Group" error. This is a generic message and is not always an indicator of the real issue.
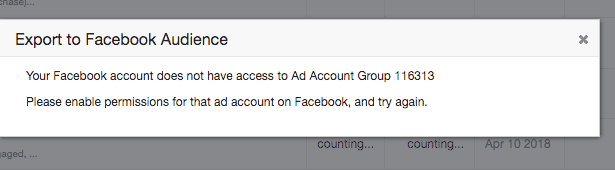
Included in the error is also which Account ID you do not have access to. If this error occurs, there are a couple of things that could be happening:
- Your account must accept Terms of Service.
- Your access level was reduced, and you will need to speak to a member of your team to make sure you have Admin or Advertiser permission in Facebook Business Manager.
- The Ad Account ID has changed and your account does not have access to the Account ID. The Engage by Sailthru <> Facebook Custom Audiences connection that you set up is still tied to the old Account ID.
- The access_token Facebook generates was changed and is outdated on the Engage by Sailthru-side, therefore your automated daily recurring Facebook exports are still tied to an old access_token.
- Check your browser for any extensions or ad blockers as these may be causing the error.
Checking Chrome Dev Tools for errors
- Go to the Lists page.
- Open dev tools. On Chrome, this would be done by right clicking on the page and clicking Inspect.
- Click on the Network tab.
- Click on the Cloud icon.
- Trying exporting the list to Facebook Custom Audiences. When the error shows up, check for any errors in the
Network tab. Click on the "customaudiences" network event and review the Response for any errors.
For example, a possible error that can be returned is:
("error":("message":"(#2664) The corporate terms of service has not been accepted.

To accept go to: https://www.facebook.com/ads/manage/customaudiences/tos.php
Verifying account access level using Facebook Graph API:
- Visit Lists page.
- Right click on the page and choose Inspect Element to open Dev tools (if you are on Chrome).
- Only after the dev tools is open, follow normal steps to export to Facebook Custom Audiences.
- Tab over to the Network tab and search for
customaudiences?accessor a network request for Facebook / Custom Audiences that looks similar to the earlier screenshot. - Right click this URL and select Copy as cURL.
- Using a text editor, paste the results. Copy the access_token, which appears after "access_token="
- Visit Facebook's Graph API tool.
- Paste your access_token in the Access Token field.
- The results should note what your access level is. For example:
{
  "id": "AD ACCOUNT ID",
  "name": "YOUR NAME",
  "permissions": {
    "data": [
      {
        "permission": "offline_access",
        "status": "granted"
      },
      {
        "permission": "whitelisted_offline_access",
        "status": "granted"
      },
      {
        "permission": "public_profile",
        "status": "granted"
      },
      {
        "permission": "ads_management",
        "status": "declined"
      }
    ]
  }
}
In the above example, the user's ads_management has a "declined" status. A member of your team can refresh
your account access.
If you have verified you do have Admin access to the account and are still seeing the error when exporting, you may also
need to reset your account access with the Sailthru app. If the Ad Account ID changed at some point, your access may
still be tied to the Ad Account ID. Following the below steps can help reset this.
Resetting Ad Account ID
- Delete the Engage by Sailthru app access. See "How do I remove an app or game that I've added?" at https://www.facebook.com/help/204306713029340/ for assistance on how.
- Log out of Facebook.
- Log out of my.sailthru.com.
- Log back into each site and follow the steps for integrating the Custom Audiences app once more.
- Please also follow the steps for "2. Confirm Ad Account Permissions" and make sure you see the right permission next to your name for the Facebook page.
- Please also verify you do not have multiple accounts (one which has the right access and the other that does not have the right access). You may be logged in with an account that does not have the right access.
- Try exporting a list to Custom Audiences.
Access Token changed
Facebook can also update your access_token in various situations, including if your Facebook
password was changed. If this occurs, any automated daily Facebook Custom Audience jobs may fail, because Engage by Sailthru
still has the old access_token; these are not updated automatically.
To update the access_token on these jobs, delete the recurring jobs and re-add them. This
will associate your new access_token with the jobs.
If the above does not work, we suggest having a colleague delete your access to the accounts and add you back in, then trying the above steps again.
2FA Error
This is a step-by-step instructional for accounts experiencing the 2FA permissions error:

- Navigate to Facebook and login to the account.
- Go to Settings > Business Integrations
- Remove the Engage by Sailthru app (img)
- Navigate to https://sailthru-fb.elementconnect.io/#/credentials and login to the original account
- Click on the Facebook tile
- [IMPORTANT] On the Facebook acceptance screen, you'll need to click on "Choose what you allow".
- You'll see that all pages are selected. You'll need to select only the pages that you want to sync.
Note: There's a top and bottom section. You'll need to select the appropriate pages for both sections. - Click continue and you'll no longer receive the error.
Export Lists with Custom Vars
As of this time, the Facebook Custom Audiences export job only exports email addresses. The reason is because this feature all of our clients use this feature, and custom variables differ across all clients. For example, the user's first name might be stored as "first_name" in your account, but "firstname" in another client's account. As a workaround, we suggest:
Step 1:
Run a job export from your account on the lists you want to export. You can select "Select Data" and input which custom
vars to include in the export.
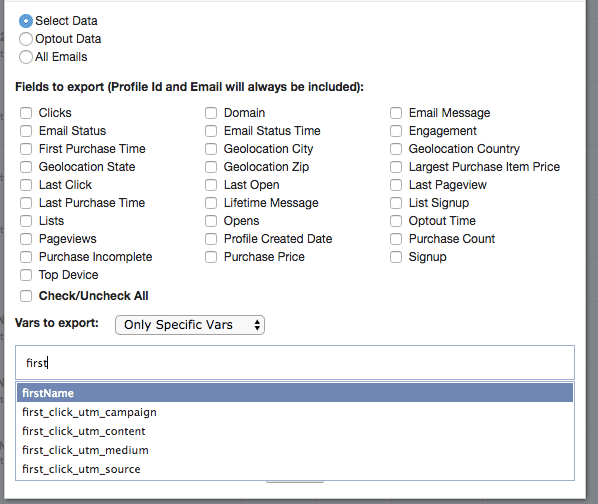
From that you can see how closely that aligns with Facebook's fields you want for additional data.
Step 2: With a custom script, push this list automatically to Facebook, making sure that your vars match Facebook's. This is the step that won't be scaleable on Sailthru's side as that exists as the same code for all customers and not everyone will use the same custom variable names.
Remove the Custom Audience App
If you no longer need to permission Engage by Sailthru to your ads account to audiences to Facebook, or you need to reset the access, you can remove the app access by following the steps on Facebook.
- Click the down arrow all the way to the right of the menu bar. From the drop down, select Settings.

- In the left-hand menu, select Apps and Website. Depending on how your account is set up, you
may find the app under Business Integrations.
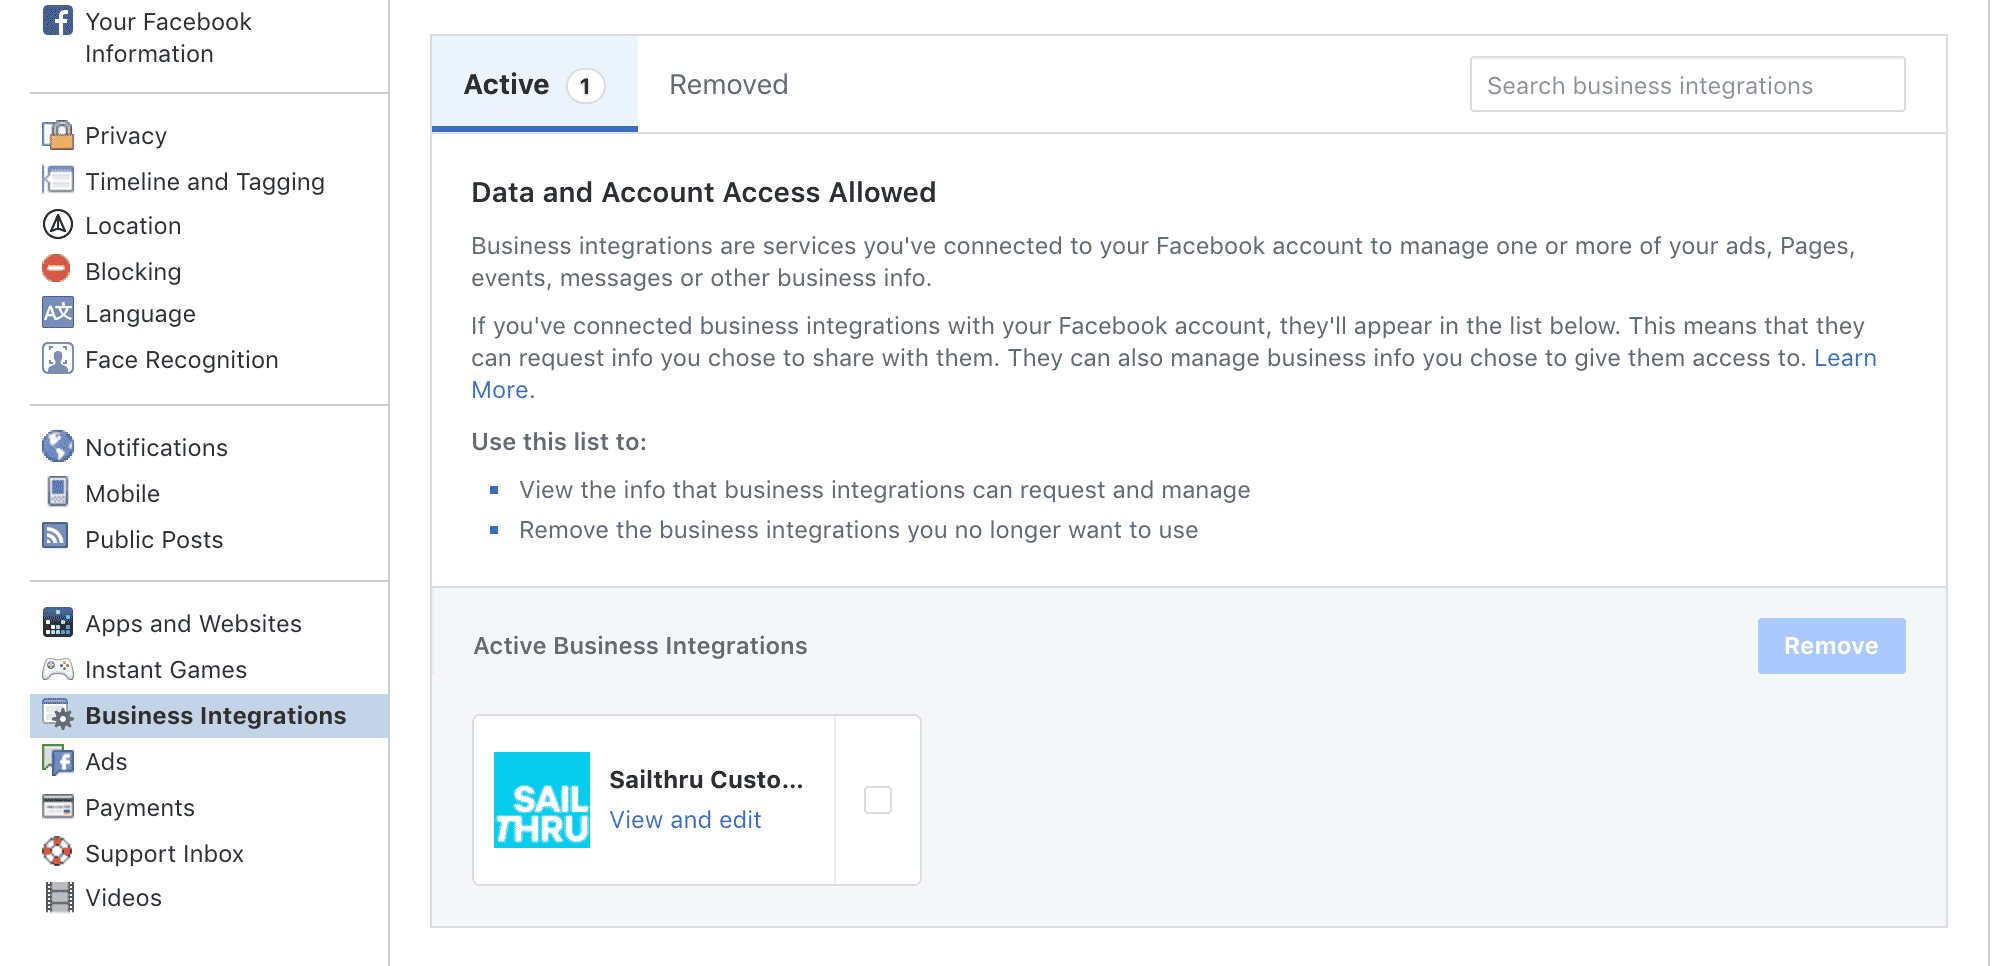
- You can click "view and edit" on the box for Sailthru. From the module, you can adjust the permissions to allow Sailthru access to manage the ads.
- Or you can check the box next to the app and then click Remove to remove the access completely.
Custom Audience FAQs
Are the audiences synced after they have been uploaded?
Audiences are not automatically updated once they've been uploaded. It will need to be a manual process if you want to
re-upload new users to the same custom audience or you can set up an automated Partner
Export.
Are users removed from the Custom Audience if the user has exited the list?
Sailthru creates a new job each time and sends the list to Facebook. They then match the hash and verify against their
user base to create a Custom Audience around the individual Facebook users on the list. But, it only uploads the new
users to the currently existing Audience and is cumulative - it does not erase.
You will see if you look at the job times as an example, when you have only one new user it adds to the Facebook
Audience in about a second, versus adding several new users to the Audience, the job takes a few seconds.
Can opted-out or hardbounced users be uploaded?
In line with Sailthru's best practices, we do not support the capability to export invalid users to Facebook. In an
effort to create a positive experience between the user and the brand, we specifically wanted to ensure that only valid
(users who had not opt-ed out) are exported to Facebook.
Is there any limit to the number of users that can be uploaded?
This isn't limited on our side. Larger lists will take longer to complete, but there isn't any max. We chunk it up into
batches of 10k when we push it to FB, as Facebook's API limits the uploads to 10,000 to upload at a given time.
The total audience size is not limited.
Documented here: https://developers.facebook.com/docs/marketing-api/custom-audience-targeting/v2.2
Total imported user count does not match
My Facebook Custom Audience does not match the list count in Sailthru, why?
The discrepancy is due to Facebook matching.
Facebook only adds people it can match. When exporting a list from Sailthru to Facebook, Sailthru uses sha256 hashed
emails and sends those hashed emails to Facebook. Then Facebook verifies if that user exists in Facebook and proceeds to
add them to the custom audience.
If the user is not on Facebook they don't get added because Facebook does not know who they are.
It is not uncommon where end users signed up for a newsletter with a work email address but their Facebook account is a
personal email address. It won't be able to find a match in those cases.
Facebook reported the custom audience could not be updated
When running your Facebook Custom Audience manually or as an automated daily export, you may receive an error like the
one following:

Facebook has determined that Engage by Sailthru can no longer update the audience and this may be due to a number of reasons on
Facebook's side. The most common reason is the ToS must be accepted for the specific audience.
To check that the Terms of Service (ToS) on the audience has been accepted:
- In Facebook Business Manager, click on the menu.
- Under Assets, click on Audiences.
- When viewing the Audiences, there is an Availability column that should say the audiences are available or it requests an action, like accepting ToS.
- Make sure to accept ToS on all audiences so they are available to update.
After accepting the ToS, try exporting the audience to your Facebook custom audience. If the audience no longer appear in the drop down, a new audience may need to be created. If you are still unable to export audiences to Facebook, please contact support@sailthru.com.