Entries
Contents
A user action or other event that starts the flow.
Email Sent
Begins a flow when a user is sent a triggered email using a specified template.- Triggered sends only, which can be initiated by Send API, Hosted Page, trigger, or LO itself--see the "Send Email" Action below.
Email Opened
Begins a flow when a user opens an email sent with specified a template or engages with a campaign sent to a specific list or label.- Template A/B variants are identified as such. You may choose to select a specific variant to be used for the entry.
Email Clicked
Begins a flow when a user clicks a link in an email sent with a specified template or engages with a campaign sent to a specific list or label.- Template A/B variants are identified as such. You may choose to select a specific variant to be used for the entry.
List Joined
Begins a flow when a user is added to a specified natural list. Adding a user to a list occurs in a few different ways:- Through a User API call
- From a Hosted Page
- Email links created using the signup_confirm Zephyr function for confirmed opt-in
- Email links with the sailthru_lists link parameter
Audience Entry
Target all profiles belonging to a specific list, then set a cadence to check the list. New profiles are added to the flow based on the check cadence.
This entry type is not available for transactional messaging.
The available cadence options are:
- Daily at a specific time
- On selected days at a specific time
Users who are new to the audience or the whole audience can start the flow. Custom re-entry settings are not available for this entry type. For more information on re-entry settings, see the Flow Re-Entry documentation.
Notes:- The flow is not immediately activated. It will activate on the first day of the schedule as per the cadence.
- If you are switching from List Joined to Audience Entry, any users on the list used for the Audience Entry will be considered new users, even if they navigated the flow for the List Joined entry.
- To avoid loading the whole list of profiles in the first run, create a blank lifecycle with just the entry and the cadence. After the first run, add the rest of the lifecycle steps; that way only new users added to the list can enter the flow.
- The scheduled cadence is in the account's timezone.
- Loading smart lists can take longer processing; the first batch of profiles that is loaded at once upon activation might take some time processing and therefore entering the flow.
List Removed
Starts a flow when a user is removed from a specified natural list.Purchase Made
Begins a flow when a user makes a purchase, as registered by a Purchase API call, bulk purchase_import Job (e.g. an initial or nightly update), or purchase JS function Restrict action based on optional filters at the order level or the item level.Order Filters
- Number of purchases made - Limit to a specific purchase or set of purchases. For example, only if it was a user's 2nd purchase. Or, only if it was between a user's second purchase and 5th purchase.
- Amount of purchase - Limit to orders of a certain dollar amount. This filter is limited to the current purchase.
- Quantity of items purchased - Limit to orders that contain a specific number of items.
- Order channel - Restrict to orders originating from a specific channel, e.g., Online.
- Value of Custom Order Fields - Limit to orders that match a value of one or more of your order-level custom key-value pairs.
Item Filters
- Value of Item ID - Limit to items that match the value of one or more of your item IDs.
- Value of Item Tag - Limit to items that match the value of one of your item's item tags.
- Value of Item Title - Limit to items that match the name (title) of one of your items.
- Value of Custom Item Fields - Limit to items that match a value of one or more of your item-level custom key-value pairs.
Contextual Purchase Data
Reference the specific purchase that triggered the Purchase Made flow with zephyr using{purchase}. For example, {purchase.items} used within the template would reference all items and item-level data in that user's purchase.
Notes
- Purchase data sent using the bulk import job will start flows
- Purchase calls with the "incomplete_purchase" parameter will not start a flow
- Adjustments are reflected in the evaluation of purchase order price
- Purchases with any order value (including negative) will start flows
- If any item in an order has a negative purchase quantity, the purchase will not start a flow
- A purchase must meet all filters applied to enter the flow.
- For item-level filters, at least one item must meet all filters applied.
- Item tags can be included as both an item var and as a nested custom var. (Use dot notation to access nested custom vars.)
- If you wish to reference the purchase that begins a Purchase Made flow, do not assign a var called "purchase" to anything within the template's Code tab. This will override the purchase object in the template.
Cart Abandoned
Begins a flow when a user's site session has gone inactive and at least one item exists in their cart.- This feature requires that your company has configured your site to sync cart data has enabled the JavaScript on your site, and has configured a template that can display the cart contents.
- For complete information, see Automate Abandoned Cart Reminders.
- Works with the Mobile SDK when implemented.
Browse Abandoned
Begins a flow when a customer's site session ends without their having purchased or added items to their shopping cart.- For complete information, see Automate Browse-Abandonment Responses.
Engagement
An automatic daily search of your account for all customers whose last activity took place on a certain day, selected as a certain number of days, weeks, months, or years ago.- Can identify if the user's most recent email click, email open, purchase, site visit, or app open occurred on the applicable day.
- Flow entries will begin between midnight and 6am the day after you activate the flow. For example, if you activate on Monday, eligible customers would enter sometime between 12am and 6am Tuesday morning.
- This job runs nightly, after midnight, in your account's time zone. Entries should be expected between midnight and 6 a.m.
- Best Practice: Use the "Wait: Move to next step when ..." within the flow to hold customers from receiving messages until a particular time of day, instead of immediately when the job finishes and the entry occurs.
- A customer must have taken the selected action (e.g. "clicked an email") at least once on the selected date--and to have not performed that action since--to be eligible for the flow.
- Best Practice: When using a small look-back period, i.e. "7 days", use frequency capping to restrict customers from entering too frequently.
- When activating the flow, the entry is not inclusive of customers who haven't clicked "more than" the period of time. For example, "Customer's last click was exactly 90 days ago," does not include customers whose last click was 91+ days ago.
Custom Event API
Begins a flow when an Event API call or event JS function call matching your specified Event Name is received for the user.- Optional filter for custom fields (vars) included with each call can include users matching specific event criteria
- Custom fields names and values are available via Zephyr to templates within the respective flow; the custom field name "class_rating" would be available in Zephyr as {class_rating}
Calendar Events
An automatic daily search of your account for all customers whose custom field value matches a particular date you enter. Use this to automatically start flows when its customers' birthdays or wedding anniversaries, or kick-off reminder series when subscription renewal dates are 30-days away. Note: Calendar Event entries should not be used for a large portion of your account's customers.- You can use any custom profile field with a properly formatted date value
- Properly formatted dates match our best practices including YYYY-MM-DD, YYYYMMDD and UNIX timestamps
- Use "Single Date" to evaluate the full date in the profile field including the year, such as for renewal notifications and wedding countdowns
- Use "Anniversary" to evaluate only the Month and Day of the profile field, useful for birthday and wedding anniversary flows
- Flow entries will begin the day after you activate the flow. For example, if you activate Monday, eligible customers would begin entering on Tuesday.
- This job runs nightly, after midnight, in your account's time zone. Entries should be expected between midnight and 6 a.m.
- Best Practice: Use the "Wait: Move to next step when ..." within the flow to hold customers from receiving messages until a particular time of day, instead of immediately when the job finishes and the entry occurs.
Predictive Entries
(functional if you have Prediction Manager) Leverage daily predictions as Lifecycle Optimizer flow entries. Four predictive entry types are available:- Disengage
- Purchase
- Opt-Out
- Visit Site
Mobile App Installed
A mobile app is considered installed when a device is registered to a profile through the Mobile SDK.- A device can be registered to a profile without an email address, so you can use this Entry to create mobile-only flows.
Mobile App Uninstalled
A mobile app is considered uninstalled when we log a device's inability to receive a push notification. This does not include devices that are off or set to airplane mode. Uninstalled apps will be recognized in one of two ways:- A marketer's push is returned with an invalid/disabled status.
- An automatic "quiet" push is sent in the background to all devices each night and is returned with an invalid/disabled status. End-users will never see this push.
Custom Profile Field Changed
Begins a flow when a customer's custom profile is set for the first time or modified.
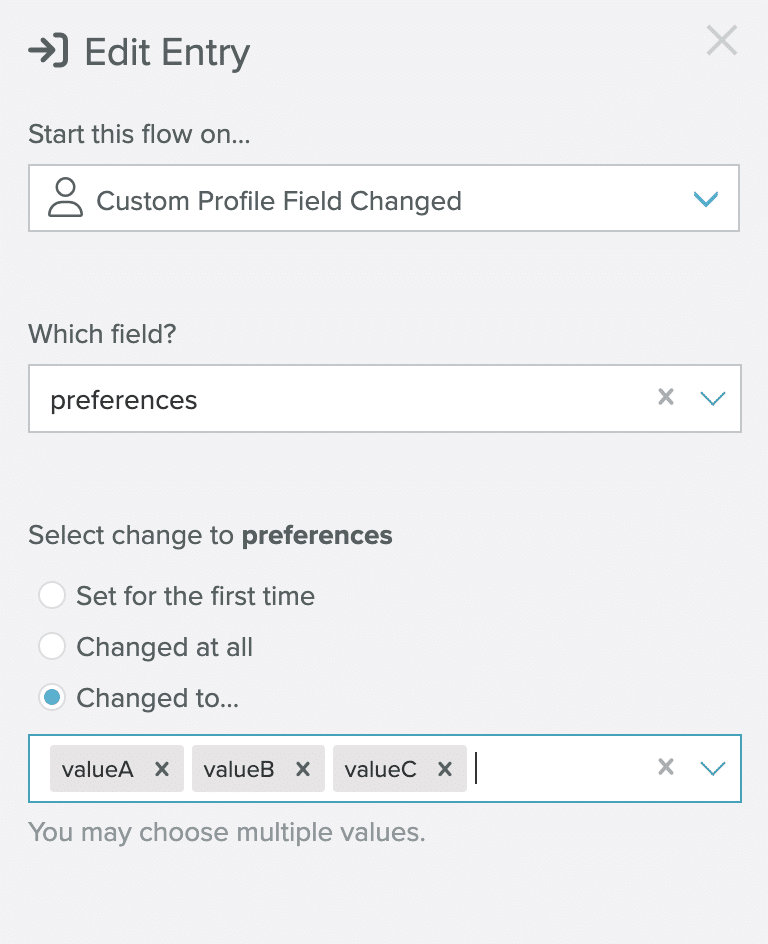
There are three different ways to trigger the flow:
- If a variable changes to a specific value (could be one or more). E.g: value matches X or matches Y or matches Z. Note: It's case sensitive.
- If a variable has been set for the first time ever in the profile.
- If a variable has been changed at all, regardless of the value that it holds.
- Values must be input for the custom field name and the custom field value
- When using the option for the variable changed to a specific value OR changed at all: if the custom field is being set for the first time or if it has changed from another value, the flow will start if the new value is the one specified in the flow.
- If the value being set is the same as an existing value, then the flow will not start.
- This entry does not work for Custom Field changes made through bulk updates or jobs.
- This entry does not work with the
append_user_var()Zephyr function. - A flow is eligible to start if the custom field is changed via Hosted Pages, LO actions, User API calls, User Profile pages, and Zephyr.