Create and Manage Overlays
Contents
Create engaging messaging for specific audiences with an easy-to-use interface.
Create an Overlay
Choose an Overlay Template
When you click New Overlay, the Choose a basic template screen opens: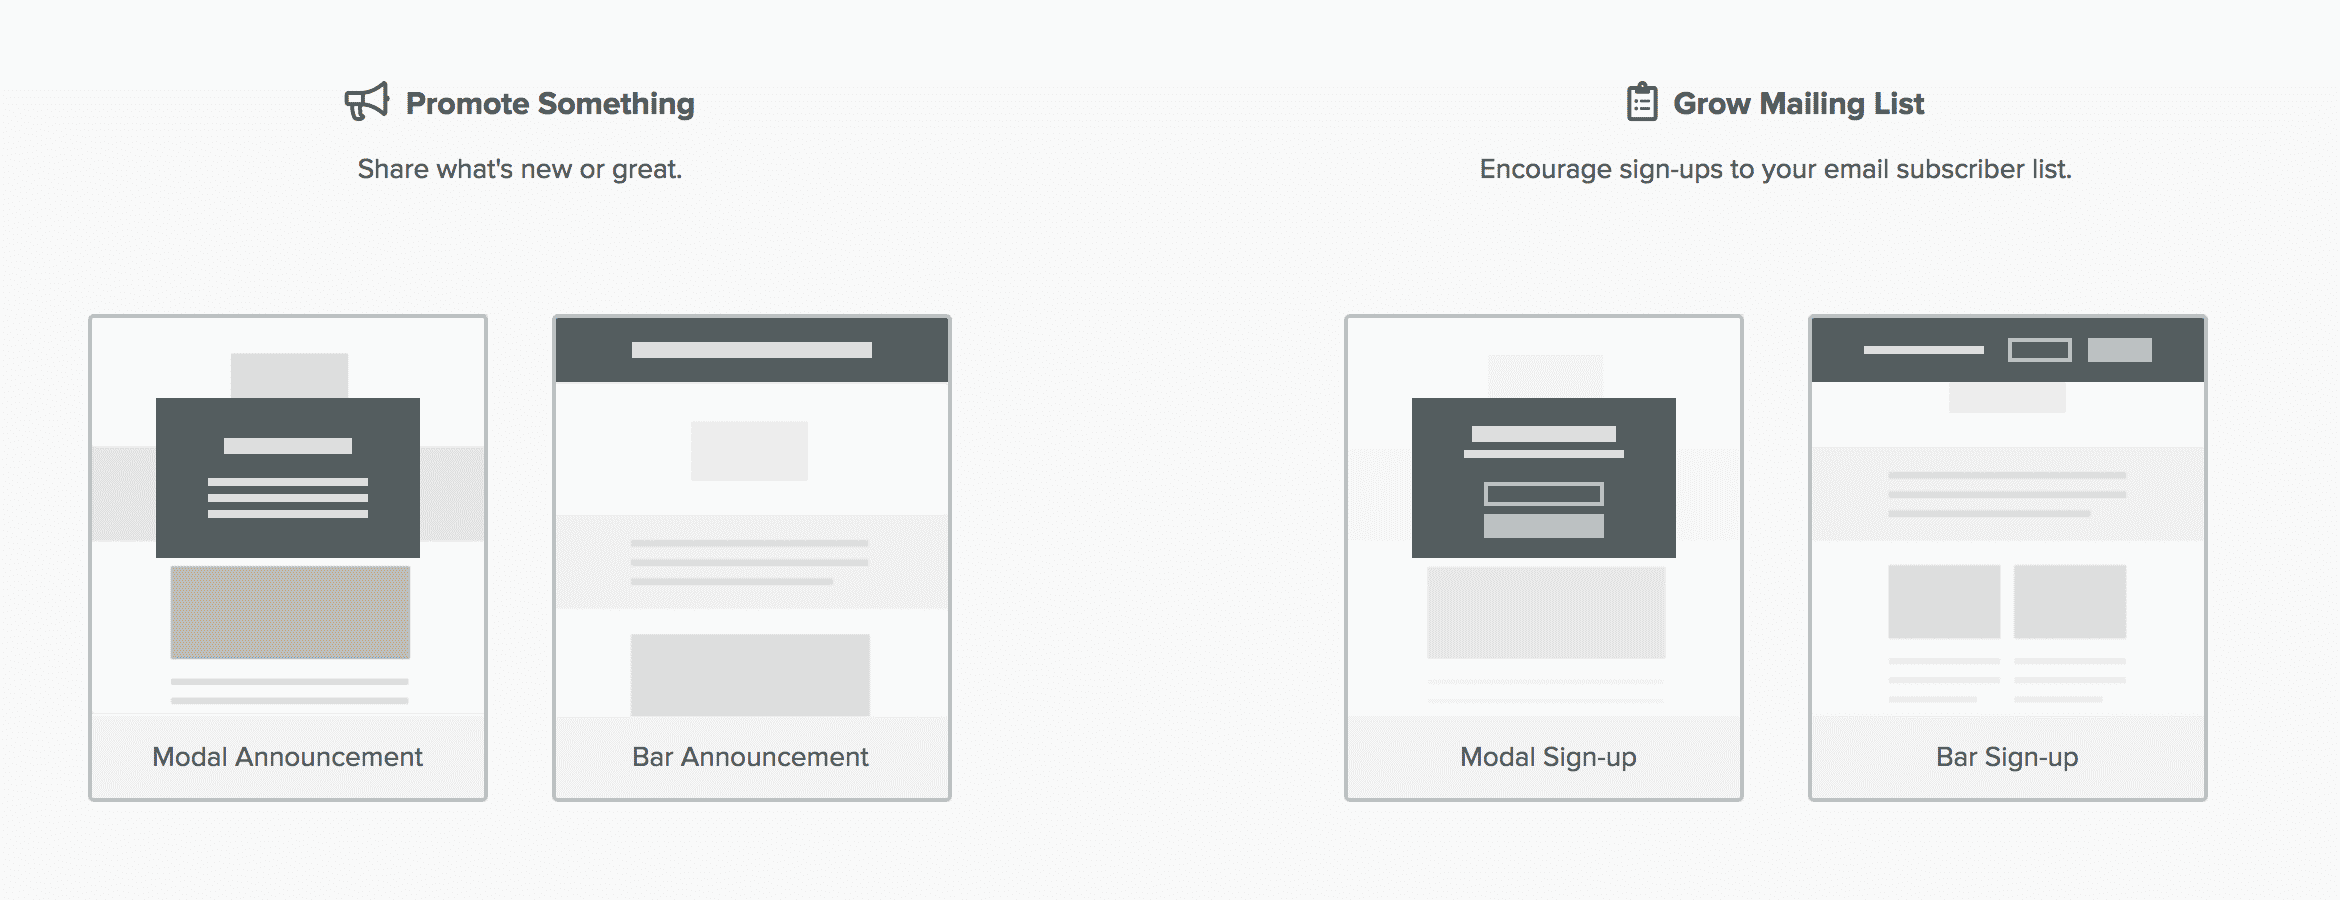 Click an image to select either bar or modal for the type of Overlay you want to create. The Overlay Builder opens.
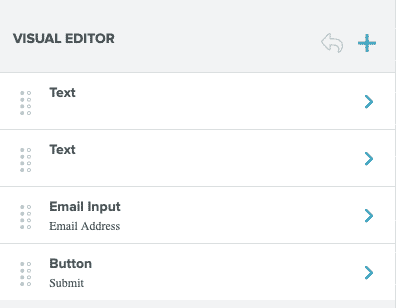
The Overlay Builder
On the Overlays page, when you click New Overlay or click the name of an existing overlay, the Overlay Builder opens.
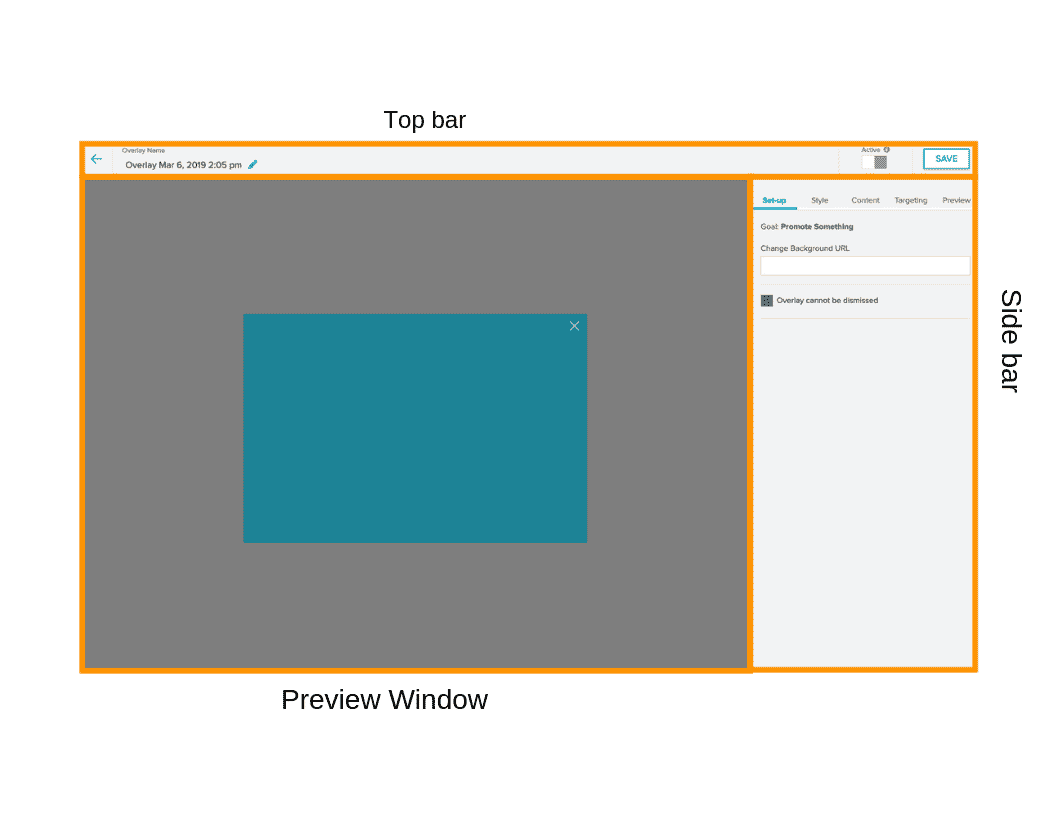
- The Top Bar displays the editable Overlay Name and Status (Active or Inactive), its Last Saved Date/Time, and a Save button to commit your changes.Pre-click and Post-click options are available for the Email Signup modal and bar Overlays. Post-click shows your selected Display Message.The overlay will not be displayed to any visitors when set to "Inactive."
- The Side Bar offers the tools for creating and editing your overlay, with five tabs: Setup, Style, Content, Targeting, Preview. Note that different options may be displayed on each tab depending on the type of overlay you have selected.
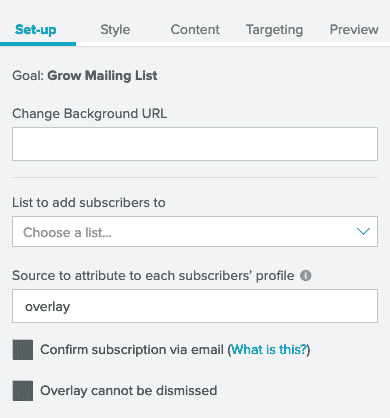
- Setup - Set the background preview URL and Overlay dismissal option.
Setup options vary depending on the type of Overlay you're creating.Note: Only Natural Lists are supported in User Sign-Up Overlays. Smart Lists are not available for selection.
Announcement Email Signup 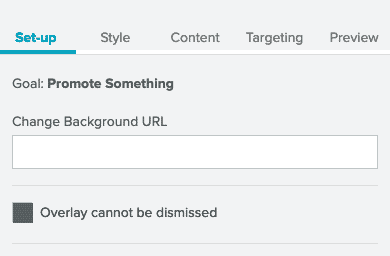
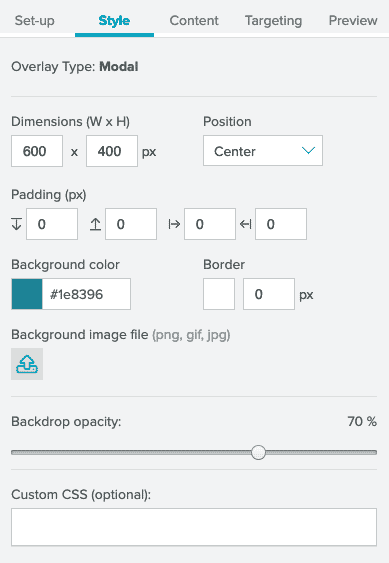
- Style - Set the overlay position, color, optional image, and background opacity. Options vary depending on the Overlay type you're creating.
Bar Overlay Modal Overlay 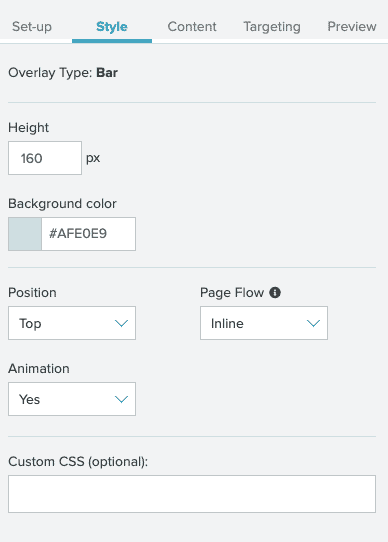
- Content - Enter the overlay content. Content options vary depending on the Overlay type you're creating.
Announcement Email Signup 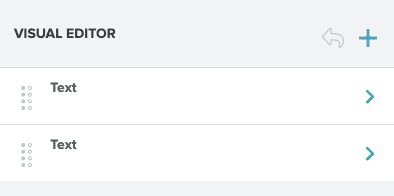
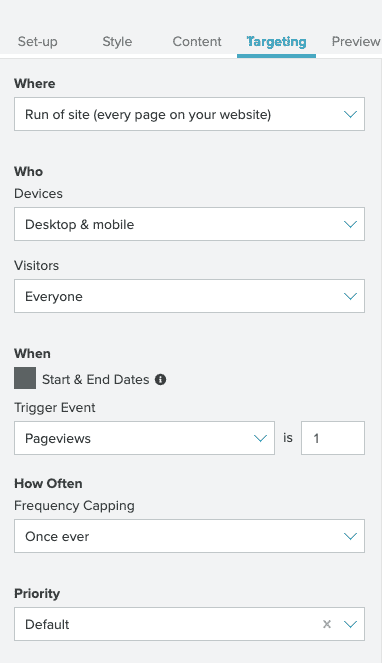
- Targeting - Select which pages, users, or user activity should launch the overlay, with optional frequency, time period, and priority settings.
Note: Smart Lists are available for selection under Visitor > Lists.
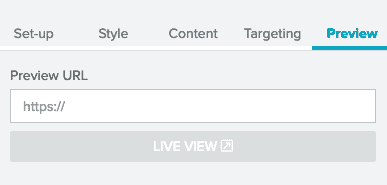
- Preview - See a live preview of your Overlay exactly as it will appear on your site after all CSS processing. It will open up in a new tab and load the Overlay on your site, provided the Sailthru Javascript tag is on the target page.
- Setup - Set the background preview URL and Overlay dismissal option.
Setup options vary depending on the type of Overlay you're creating.Note: Only Natural Lists are supported in User Sign-Up Overlays. Smart Lists are not available for selection.
- The Preview pane shows the current appearance of your overlay against the URL you set as the background.
- Set the preview URL in the Setup tab Change Background URL dialog box.
For more information about any of the individual settings within the builder, see Overlay Settings, below.
Overlay Settings
Setup
| Setting | Options | Availability |
| Change Background URL | Enter the URL for your selected background. | All Overlays |
| List to add subscribers to | The lists to which the user should be added. Note: Only Natural Lists are supported in User Sign-Up Overlays. Smart Lists are not available for selection. | User Sign-Up |
| Source to attribute to each subscribers' profile | Enter a source var which will be added to each subscriber's profile. | User Sign-Up |
| Confirm subscription via email | If enabled, the selected Confirmed Opt-In template is sent and the user is not added to the list until they click the link you have provided in the email. If disabled, the user is added to the Destination Lists immediately upon their submission of their email address, and the sailthru_hid cookie is set to identify the user for current and future browsing sessions. Using confirmed opt-in can cut down on the number of bot sign-ups. | User Sign-Up |
| Overlay cannot be dismissed | When selected, the Overlay cannot be dismissed. | All Overlays |
Confirmed opt-in with the signup_confirm() function
- A user clicks to sign up from your Overlay. The system creates an array called "signup_lists".
- The array contains the lists you selected from the Destination List drop-down menu. For example, if you select "Daily Newsletter" and "Weekly Deals", then the signup_lists array resembles the following:
{signup_lists=["Daily Newsletter", "Weekly Deals"]}
- The array contains the lists you selected from the Destination List drop-down menu. For example, if you select "Daily Newsletter" and "Weekly Deals", then the signup_lists array resembles the following:
- Automatically pipe the array into the signup_confirm() function. The function is contained in the link you send in your signup confirmation template.
<a href="{signup_confirm(signup_lists)}">Click here to confirm your email address</a> - When the user clicks the link in the confirmation email, the system adds them to the selected lists.
- The user is redirected to a confirmation page. To use a custom page instead of your default Thank You page, create an "Other"-type Hosted page named "signup-confirm".Note: The type "Other" and the name "signup-confirm" are required to access and edit the signup confirmation page.
Style
| Setting | Options | Availability |
| Overlay Type |
|
All Overlays |
| Dimensions | For desktop browsing environments only. Sets the maximum width in pixels for the Overlay. If the viewport width is less than the value in this field, the modal will adapt responsively, reflow the content of the overlay, and fit to the narrower viewport size. When the viewport is 550px or less, a mobile view is initiated which always sets the Overlay width to 90% of the current viewport width. Default height: 400px Minimum height: 100px Default width: 600px Minimum width: 100px |
Modals |
| Height | The minimum height when the content within the bar does not force a greater height. Default height: 100px Minimum height: 40px |
Bars |
| Position | Modal Overlays Select whether the modal should be located near the top, middle, or bottom of the browser window. The modal will always be centered horizontally on the page.Bar Overlays Select the pinned location of the bar within the browser window. The bar can be pinned to the top or bottom of the page. | All Overlays |
| Padding | Set the padding for your Overlay's content. | Modals |
| Background Color |
|
All Overlays |
| Border | Set the pixel width of the Overlay border. | All Overlays |
| Background Image | You can use this feature to upload an image to display in the overlay. The image can be displayed above, below, or alongside text, or as a background image.
Note: It is also possible to display an inline image that is instead hosted on your site or elsewhere by embedding it with your own custom HTML.
To upload an image, click the toggle next to the words "Background Image". Then:
|
Modals |
| Background Screen Opacity | The percentage visibility of the page behind the overlay when the overlay is displayed. | All Overlays |
| Page Flow | Inline - Pushes the page content down Fixed - Covers the top portion of the page | Bars |
| Animation | Because the bar loads after your page, customers will experience a "jump" - page content will move down to make space for the bar. Using animation helps to ease this transition. | Bars |
| Custom CSS | Add custom css to style your Overlay. Any CSS entered in this field applies to the entire Overlay, and is the simplest way to do advanced style customization, rather than inputting CSS in other text fields within the Content tab. | All Overlays |
Content
Note: Safari does not support changing text alignment of drop-down elements (<select>). They will always be left aligned.
| Setting | Options | Availability |
| Text | Overlay text field. Use the editor options to change the font, size, color, and other attributes. HTML is supported in text fields for adding additional form elements to your Overlay that are not available in the editor. | All Overlays |
| Email Input | Set and format email field placeholder text. | User Sign Up |
| Button | Select a button color, enter button copy text, and configure a Post-Click Action.
For the Post-Click Action, you may either enter a message to display or a URL to which the user will be redirected. If you enter a message, after the user submits their email address, the message is displayed for 5 seconds before the overlay is automatically closed.For the Post-Click Redirect, the user's submitted email address will be automatically appended to the URL as a query parameter named em. For example, if you enter example.com/?utm_source=spm#welcome and your user enters user@example.com, the user will be redirected to example.com/?utm_source=spm&em=user%40example.com#welcomeNote that if you have included custom JavaScript functions to handle the response to the user's email submission, after the post click event is triggered, the overlay will be closed automatically after 5 seconds. The 5 second time delay cannot be customized. See the Sailthru.initfunction's onSignupSuccess/onSignupError parameters. |
User Sign Up |
Additional Content Options
| Setting | Options | Availability |
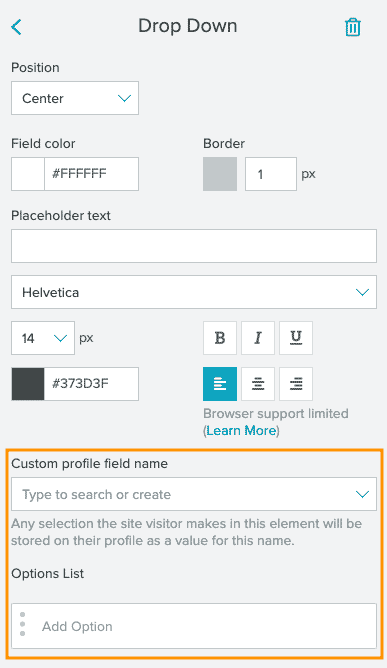
| Drop-down | Set and format options to select from a drop-down list. Add a custom field name to collect additional information in your Overlay. | User Sign Up |
| Input Field | Set and format an additional input field. Add a custom field name to collect additional information in your Overlay. | User Sign Up |
| Text | Additional text field. Use the editor options to change the font, size, color, and other attributes. HTML is supported but not required. | All Overlays |
Adding Custom Elements in HTML
You may wish to add additional form elements to your Overlay that are not available in the UI, like a button, radio button, or checkbox. Add any additional HTML elements in a Text field. To add a Text field to your Overlay:
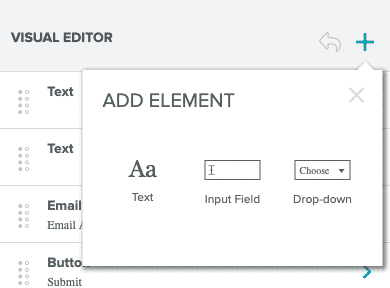
- From the Content tab, click the plus icon
 in the Visual Editor panel to open the Add Element menu. Select Text from the menu to add a Text field.
- Select the new text field to open it. Add your HTML in the Copy section:

<input type="button">
To create a labeled, working button, you'll need to add an onclick event and a value.
<input type="button" onclick="alert('This is an alert box')" value="Click Me!">
To add a reset button, use the following markup as your Copy:
<input type="reset">
This allows users to return any fields to their default state. Adding a Checkbox
If you want to allow users to select multiple options, you'll need to add checkboxes to your Overlay. To add a checkbox, add the following markup to your Copy field.
<input type="checkbox">
To capture user data with the checkboxes, create a form:
<label>Select your favorites: </label>
<form class="sailthru-var" data-var-name="flavor" data-var-attribute="value">
  <input type="checkbox" name="flavor" value="vanilla">Vanilla
  <input type="checkbox" name="flavor" value="chocolate">Chocolate
  <input type="checkbox" name="flavor" value="pistachio">Pistachio
</form>
For more information, see Capture Additional Data in an Overlay.
Targeting
| Setting | Options | Availability |
| Where | You can select to display the overlay "Sitewide" or only on "Specific Page(s)". When you select "Specific Page(s)", additional options are displayed for selecting those pages. Click "Add URL" to add at least one URL or URL pattern. A field for the URL/pattern is displayed, and it will be treated based on your chosen type of matching below: Simple, Exact, or Contains. (See URL Targeting Details.) If you add multiple URLs/patterns, they are treated with 'OR' logic-the URL must match only one of your entries in order for the overlay to be displayed. | All Overlays |
| Who | Display the user to:
|
All Overlays |
| When: Trigger |
|
All Overlays |
| When: Frequency Capping | Limit the number of times that the Overlay may be displayed for the user:
|
All Overlays |
| When: Start and End Dates |
|
All Overlays |
| When: Priority | Available Priority options include High, Medium, and Default. By default, all Overlays have a priority rating of Default. The Priority options dictate which overlay will be shown on a single page visit for a given trigger event (the When entry in this table). More than one overlay may show on the page if different overlays are targeted under different trigger events. Overlays are prioritized according to the following rules:
|
All Overlays |
Create an Email-Triggered Overlay
Trigger an overlay for users who click from an email.
- Create a new overlay or select an existing overlay.
- Set the Trigger Event from the Targeting tab. Select "User clicks from an email" from the dropdown menu.
- To use a promo code, set it up as you usually would in your campaign and call it in your message template. To show the code in your overlay, use
{page.STpromo}in your overlay text. - Save your work. You can move to the next step without activating your overlay, but it must be activated before sending the email.
- Go to your Campaigns page.
- Create a new campaign or modify an existing campaign to link it to your overlay.
- In the Campaign workflow Configure tab, go to the Personalize section.
- Select the name of your email-triggered overlay from the Triggered Overlay dropdown menu. You may link an inactive overlay to your campaign, but you must activate the overlay for the email link to trigger the overlay.
Targeting with Key-Value Pairs
Boost your targeting power with nearly anything your site is capable of passing through Javascript. Targeting Overlays has been connected to profile recognition. Now, through a Javascript parameter, you can leverage almost any site visitor information you track, whether through cookies, local storage, or URL parameters. Prerequisites
- Sailthru.JS is already installed
- Working implementation of overlays
- You have an Engineering team or someone capable of making the JS changes
What to expect about targeting using key-value pairs
- Initial adjustments to sailthru init
- Example to grab values from cookies and insert a key and a value to init
- Advisory on other use cases (url params, local storage)
Adjustments to sailthru init
There is a new parameter calledoverlayKeyValue which is an object with string values for key and value. A user can include any number of keys and values, and will match one pair given the setup done in my.sailthru. That is, out of the one-or-more key-value pairs passed via the JS, our service will see if a key-value pair matches with an Overlay. If the case is true, then the Overlay will return. Other key-value pairs that do not match are silently ignored. Note that only string values are supported at this time, and values such as numbers or Booleans are not.<script src="https://ak.sail-horizon.com/spm/spm.v1.min.js"></script>
<script>Sailthru.init({ customerId: '<yourID>', overlayKeyValue: {test_key: "test_value"} });</script>Example to grab values from cookies and insert a key value to init
Within your implementation, we encourage you to pass in more key-value pairs via the JS than needed. That is, the more information about the user that your web application manages or depends upon which gets passed to the system, the easier it is to grant a marketer flexibility in their targeting schemes! We expect that passing more key-value pairs can simplify the JS implementation and make Overlays targeting setup (from a marketer's perspective) less dependent on an engineer.foo: Sailthru.getCookie('sailthru_hid'),In the example snippet above, an engineer would place the following inside of the
overlayKeyValue object which would then be parsed by our service. On the marketer's end, when they set up an Overlay, in order to match the example above so that the Overlay only fires for that key and value, they would set the key field to read foo and the value field to read [specific hid value] if the intention is to target a very specific user. Other system or non-system cookie values can be passed in as desired.Advisory on Other Use Cases
We know that in today's landscape, for retail or media customers alike, there's plenty of trends that have been happening over the past few years. Some examples include:- Expanded paid advertising campaigns which pass users over by UTM parameters.
- The increase of quiz experiences to guide a user through several questions and acquire information, which is either stored in cookies or in local storage.
- The increase of third-party libraries that customers may depend upon to power features like currency and translation services (i18n) or audience matching (DMPs, etc.).
Instead of developing bespoke solutions for each of these scenarios, we've developed a broader solution to help engineering teams unlock the targeting potential using Javascript. That means you can use industry-standard Javascript APIs for deriving key-values to pass to the system.
As a brief reminder, we like to refer to documentation resources broadly available such as the ones listed here:
- MDN: Local Storage
- MDN: Location (for accessing data in URL)
- MDN: URLSearchParams (for accessing query string values, modern browsers only)
URL Targeting Details
URL Targeting allows you to specify which of your site's URLs will display the overlay. Four types of URL targeting are available:
| Type | Definition | Examples |
|---|---|---|
| Simple | Enter a URL and the system will disregard any query string and protocol, matching only those URLs that contain the same domain and path or file extension. |
Enter: example.com/category or example.com/category?item=123 Matches Include: http://www.example.com/category https://example.com/category http://www.example.com/category/item http://example.com/category/cat2/pg.htm?x=1 http://example.com/category?item=456 Does Not Match: http://www.example.com/other/ http://shop.example.com/category/ Enter: example.com/category/page.html Matches Include: http://www.example.com/category/page.html https://www.example.com/category/page.html http://example.com/category/page.html https://example.com/category/page.html Does Not Match: http://www.example.com/category/ http://www.example.com/category/contact.html https://shop.example.com/category/ |
| Exact | Matches the entered URL exactly. Trailing slashes will be ignored. |
Enter: https://example.com/ Matches Include: https://example.com https://example.com/ Does Not Match: http://example.com https://www.example.com https://example.com/item/123 |
| Contains | Matches only URLs that contain or exactly match the entered text |
Enter: apparel Matches Include: http://example.com/category/apparel http://example.com/blog/check-out-our-apparel Does Not Match: http://example.com/accessories Enter: http://example.com/category/apparel Matches Include: http://example.com/category/apparel http://example.com/category/apparel/item/123 Does Not Match: https://example.com/category/apparel |
| Pattern | Matches only URLs that contain specified "regular expression" pattern within them. | Enter:
exampleMatches include:
https://example.com
https://example.net
https://www.example.com/something.html
https://baddomain.com/exampleDoes not match:
https://exam.com
Enter: ^.*\.example\.com Matches include: http://example.com https://www.example.com/something.html Does not match: https://example.net https://baddomain.com/example https://exam.com Enter: ^((?!fox).)*$ Matches include: https://example.net https://baddomain.com/example Does not match: https://baddomain.com/fox https://fox.net https://www.example.com/fox.html https://example.com/path?fox |
URL Fragment Targeting
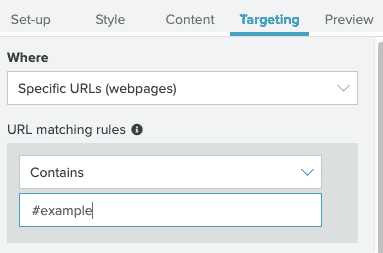
When you want to display an overlay based on a website path that contains a #, use URL fragment targeting.
This option involves adding code to the Sailthru JS on your website. You may need developer resources to activate fragment targeting.
- Alter the Sailthru JS init block to include the 'fragmentEnabled' flag.
//Customers must set this flag to enable fragment targeting. //This is not a breaking change for customers who decide not to use this feature. //In cases where this flag is not enabled, then targeting will operate such that the fragment character and trailing values are ignored. Sailthru.init({ customerId:, fragmentEnabled: true }); - Push the change and verify that the new init block is in place on the website.
- Create an overlay's targeting, in the 'Targeting' portion of the Editor, either with or without the '#' character as you require. Your URL matching rules may resemble the following image:
Preview Your Overlay On-Site
You can use a special query parameter in your site's URLs to preview any overlay to see how your overlay design and website CSS will interact, regardless of its status (active or inactive) and targeting rules. Stats are not counted for this feature. Simply append the following to your URL:
#STpreview=<overlayID>&STshowOverlay=1
To obtain the overlayID, open the overlay's configuration page within My Sailthru. The ID is the portion of the URL after the last slash. For example: https://my.sailthru.com/spm/overlays#/0c4ed9e1-32ba-4124-94b9-d0ea7909cb01
Capture Additional Data in an Overlay
Add form elements to your Overlays to collect and record user information that's relevant to your marketing efforts. Any information you captured in a standard form you can now capture through your Overlays. Segment, target, and message your users more effectively with additional information.
Using Built-In Form Elements
Overlays offer built-in form elements to capture user data with no code needed. Add form elements from the Visual Editor by clicking the plus sign:
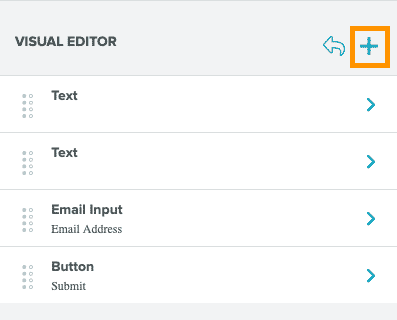
This opens the Add Element menu:
Selecting an Input Field or Drop-down element allows you to add custom fields to capture information.
 |
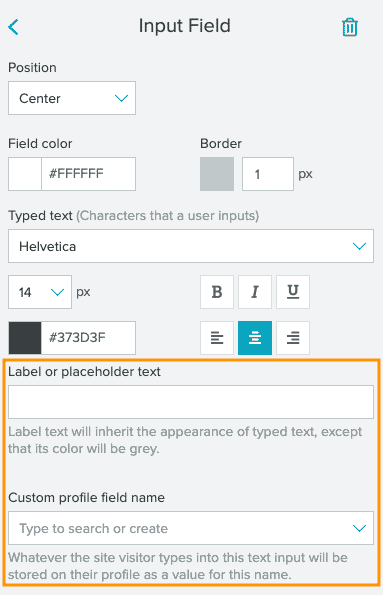 |
When a user makes a selection from a drop down options list or enters a value into an input field, it is added to their profile under your selected custom profile field name.
Using HTML Elements and Attributes
The best way to collect more user information on signup is with HTML form elements. For example, the following markup indicates the class, var name, and var attribute:
<input type="text" class="sailthru-var" data-var-name="first_name" data-var-attribute="value">
The sailthru-var class indicates to JavaScript that the element contains var data. The markup above also specifies the var name and the name of the element that contains the var value.
| Attribute | Description | Allowed Values |
|---|---|---|
class |
Associates CSS styles with the element. JS will use a special class to indicate that the element contains var data. | sailthru-var |
data-var-name |
Specifies the name of the var to populate. | Any valid profile var name. |
data-var-attribute |
Specifies the name of the element attribute that contains the var value. | Any valid HTML element attribute name. |
Here are some examples of capturing user information using element tags:
Capture a user's first name
<input type="text" class="sailthru-var" data-var-name="first_name" data-var-attribute="value">Capture a user's favorite subject
What's your favorite subject?
<select class="sailthru-var" data-var-name="favorite_subject" data-var-attribute="value">
  <option value="ela">Readin'</option>
  <option value="law">Ritin'</option>
  <option value="math">Rythmatic</option>
</select>
Capture a user's gender
The option name must match the data-var-name. In this example, the data-var-name is gender, which is matched by the input element's name.
<label>Gender: </label>
<form class="sailthru-var" data-var-name="gender" data-var-attribute="value">
  <input type="radio" name="gender" value="male">Male
  <input type="radio" name="gender" value="female">Female
  <input type="radio" name="gender" value="other">Other
</form>
Capture a user's birth date
<input type="date" class="sailthru-var" data-var-name="birth_date" data-var-attribute="value"/>Add an additional opt-in option
<label>
<input type="checkbox" class="sailthru-var" data-var-name="books_signup" data-var-attribute="checked"/>
Sign up for exclusive books news!
</label>
Signup var Precedence
userSignup and userSignupConfirmedOptIn ,two functions in the JavaScript API, use the following var sources in this order of precedence:
- Sailthru.signupVars
- HTML elements
- User vars passed through the "integration" module to the signup functions:
Sailthru.integration("userSignup", {vars: {...}, ...}).This can happen at user conversion or at any time.
- Add a similar JavaScript custom function to your website, after the Sailthru init block. The custom function would not be inside of the init block. [ ] The Sailthru JavaScript <script> that corresponds to the code mentioned in the Copy field in step 2 would be:
When the Close button is clicked, the function sets the cookies Do Not Track flag and hides the overlay from the user.// This function is called from the Sailthru Editor UI. function customCloser() { Sailthru.track('cookiesDoNotTrack'); Sailthru.overlay('hide'); };
- Finish designing your overlay.
- Save and deploy your overlay.
Conditional Overlay Rendering
When you wish to conditionally control which users see an overlay, use the onBeforeOverlayRender function in your site Javascript. Replace someVar in the sample with your chosen value.
const someVar = false
const showOverlay = () => {
    if (!someVar) {
        return false
    }
}
Sailthru.init({ customerId: '', onBeforeOverlayRender: showOverlay });
Add Custom CSS to Overlays
When creating an overlay, you may need to add custom elements. Overlays allow you to use both custom CSS and HTML.
Use Overlapping Elements
Using CSS allows you to add both a custom input element, like a date picker, and a label for it. The following uses both HTML and CSS to add and style a date picker.
Add HTML
- Create a new Overlay or open an existing one. This example uses a User Sign-up overlay.
- In the Content tab, add a text element. Select the element to edit the options.
- Add the following HTML in the Copy textbox. The input you're adding will send the entered birthdate as a custom field or variable.
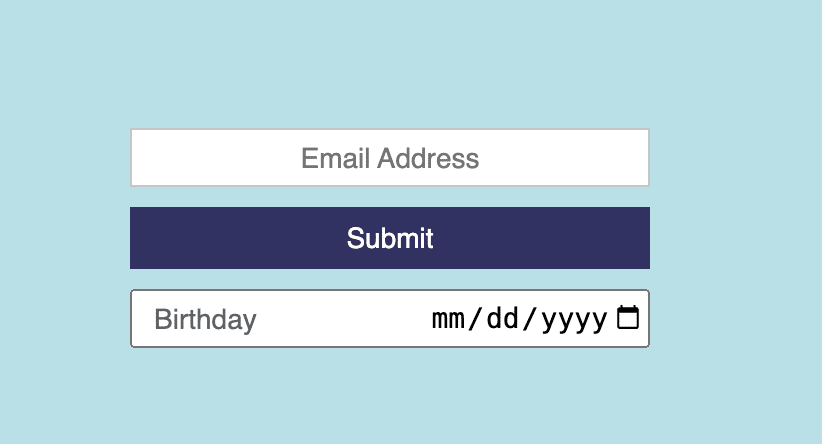
This adds a new section to your overlay, identified as DOB. The input and label elements within the section also have an id, which allows you to use CSS to add styling. You should see a date picker with the label Birthday underneath it in your overlay.<div id="DOB"><div><input type="date" id="birth_date" name="birth_date" class="sailthru-var" data-var-name="birth_date" data-var-attribute="value" placeholder="YYYY-MM-DD" style="font-size: 14px; font-color: inherent;" /></di> <div><label id="label">Birthday</label></div>
Add CSS
- Open the Style tab for your Overlay.
- First, add the CSS selector and declaration for the input and select elements. This will set everything at the same width and use a height relative to the font size:
input, select { width: 260px; height: 2.1em; } - Next, set the position for the DOB section.
#DOB { position: relative; } - Add styling for the label.
#label { position: absolute; top: 7px; left: 182px; color: rgba(55,61,63,0.8); } - Set the position for the date picker element. This sets it to the right of the container, keeping it from overlapping with the label.
#birth_date { color: rgba:(55,61,63,0.8); text-align: right !important; } - Your overlay should resemble the following image: