Getting Started with Product Sync
Contents
Product Sync is the recommended way for e-commerce retailers to import their products or content to the Content Library. Product Sync provides the ability to import, delete, and update content by linking directly to your Google product feed. If you don't have a Google product feed, Marigold Engage by Sailthru also offers two other approaches for importing customer products or content into the content library: the Content API and Javascript Spider.
Google product feed files are the primary data source that e-commerce websites use to display their products on Google. These feeds are maintained by our customers and are their own source of truth. Any updates in their feed file will be reflected in the database or content library. For more information, see Google's help. This page will guide you on:- Product data specification
- Creating a source
- Editing a source
- Deleting a source
- How tags are created
- Adding custom tags
- Using Content API and Product Sync
Product data specification
Google has developed a specification for the formatting of product data for displaying shopping ads within Google search. The specification supports XML, TXT, and TSV/CSV files and includes many product-related fields such as price, shipping information, color, and size. Product Sync can read files which meet this specification and is able to transform this data into Sailthru's content format and store it in your content collection. The full product data specification is available in the Google Merchant Center documentation. Files which do not fully meet the specification may not be supported. Files larger than 320 MB are not currently supported, but you can create multiple feeds. To keep the inventory of each product iup to date from within your Google Product Feed, include sailthru_inventory as a custom field in your feed. This will allow you to use features that rely on inventory, such as dynamically displaying content based on inventory.Creating a Source
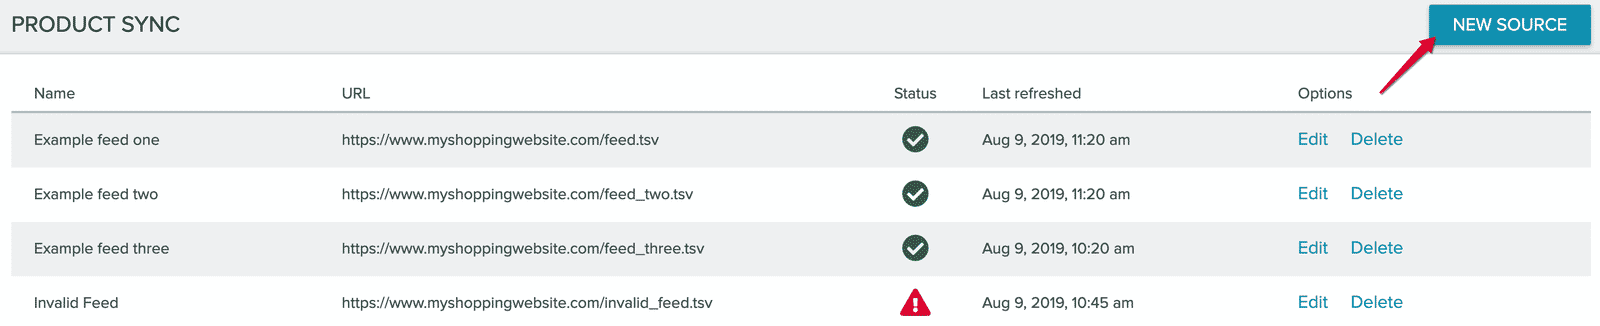
Using the Content navigation bar, click on Product Sync. It will redirect you to a new page which shows all the Google product feeds that have been uploaded recently. After the name and URL for the feed, there are three columns give more information about your feed.- The Status column represents the current state of the uploaded GPF.
- The Last Refresh column displays the last time a source had been re-imported or refreshed.
- The Options column allows you to either configure or delete a source.
- Click on the NEW SOURCE button on the top right corner.
- Add a unique name for your source in the Name field. Using a different name for each source will help distinguish sources from each other.
- Add the source URL for your GPF files in the Source URL field. This can be in XML or TSV format.
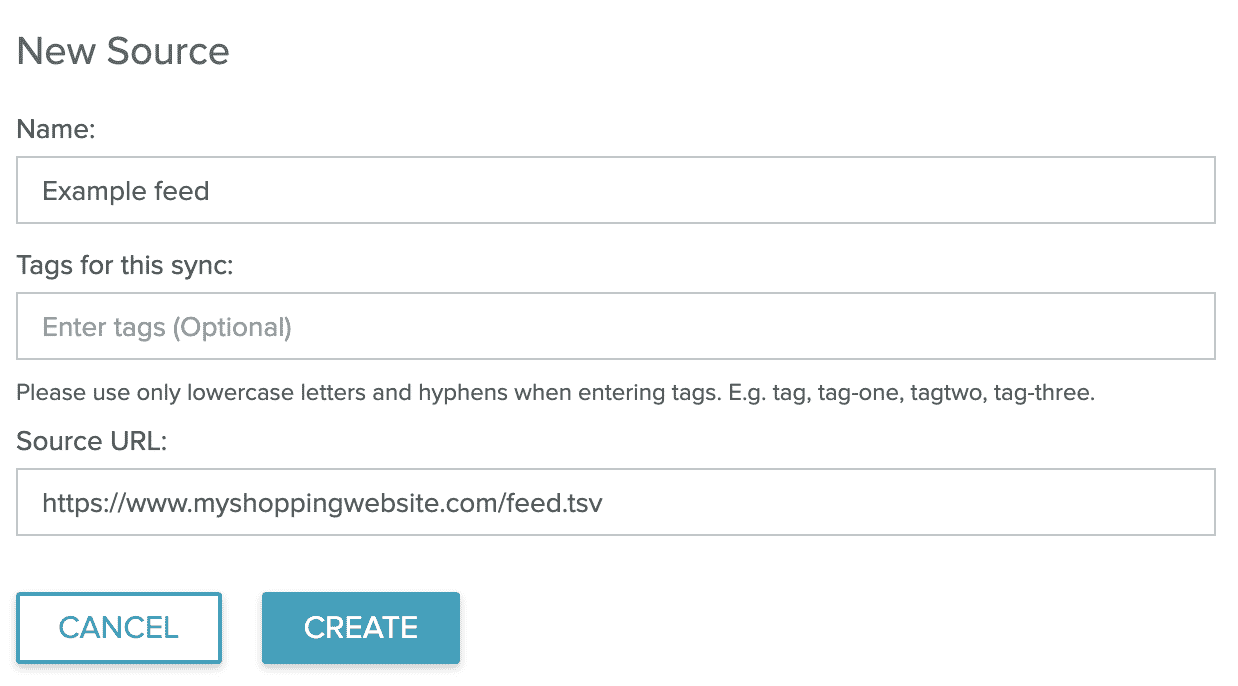
- Add any optional tags in the Tags for this sync field. This field allows users to define the tags that are added to each individual product from the source. If you are managing multiple sources, it will help to distinguish them from each other.
- Example: Uploading two winter catalogs, clearance and new styles. Styles from each catalog (jackets, scarves, gloves, etc.) can be differentiated with tags.
- Example: Recommending products based on currency, language, or region. With tags, customers in North America will only be recommended products in English and USD, while customers in Germany will only be recommended products in German and EUR.
- Once a new source has been created, it is immediately processed by one of the back-end services which starts the import process.
- The source will automatically refresh every hour to check for updates or modifications, so you don't have to add a new source each time.
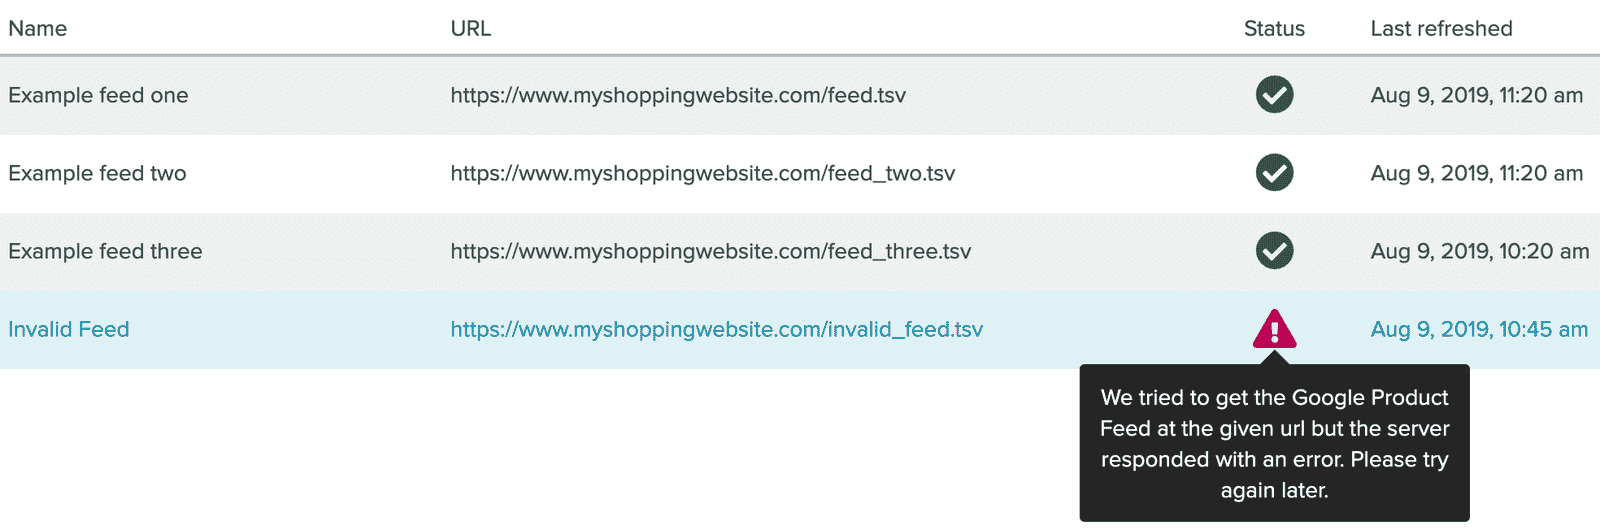
- You will be redirected to the index page which displays the status of the source. An icon shows the status:
- Hourglass - the source is being processed.
- Green tick mark - the source was successfully uploaded or refreshed.
- Alert - the source URL could not be located or an import error occurred. Hovering over the alert symbol displays the cause of the error and a suggested solution.
- Navigate to the Content Library page to see the contents uploaded by your source.
Editing a Source
If you accidentally entered the incorrect information for your source or simply want to update the fields, you can edit your existing source.- Click the Edit button in the Options column.
- You will be directed to a new page showing the existing information for your source.
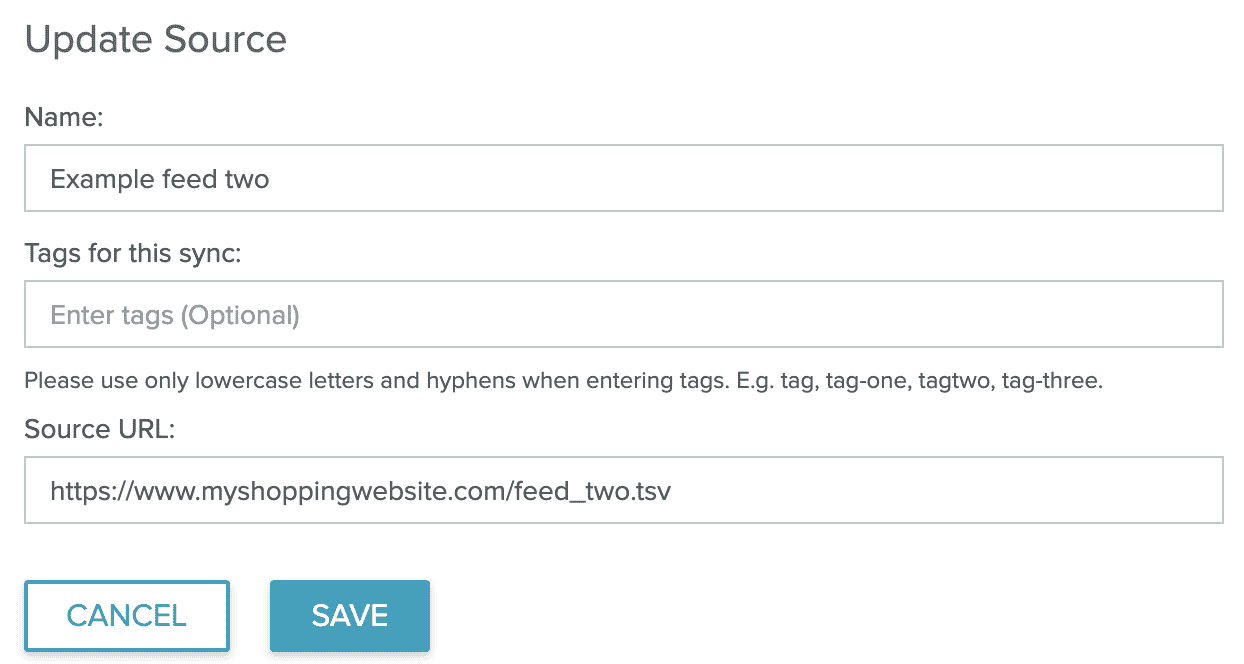
- Enter the new values for your source.
- All form fields are editable. Changing the source URL or tag fields prompts a new import process.
- Click the Save button to save your changes.
Deleting a Source
When you delete a source, the content previously imported from the source will remain in your content library marked as expired. You can permanently remove them through the Content API.- Click the Delete button of the source you want to remove.
- A pop up a dialog box will show to confirm your action.
- Click Delete to delete a source.
- Click Cancel to go back.
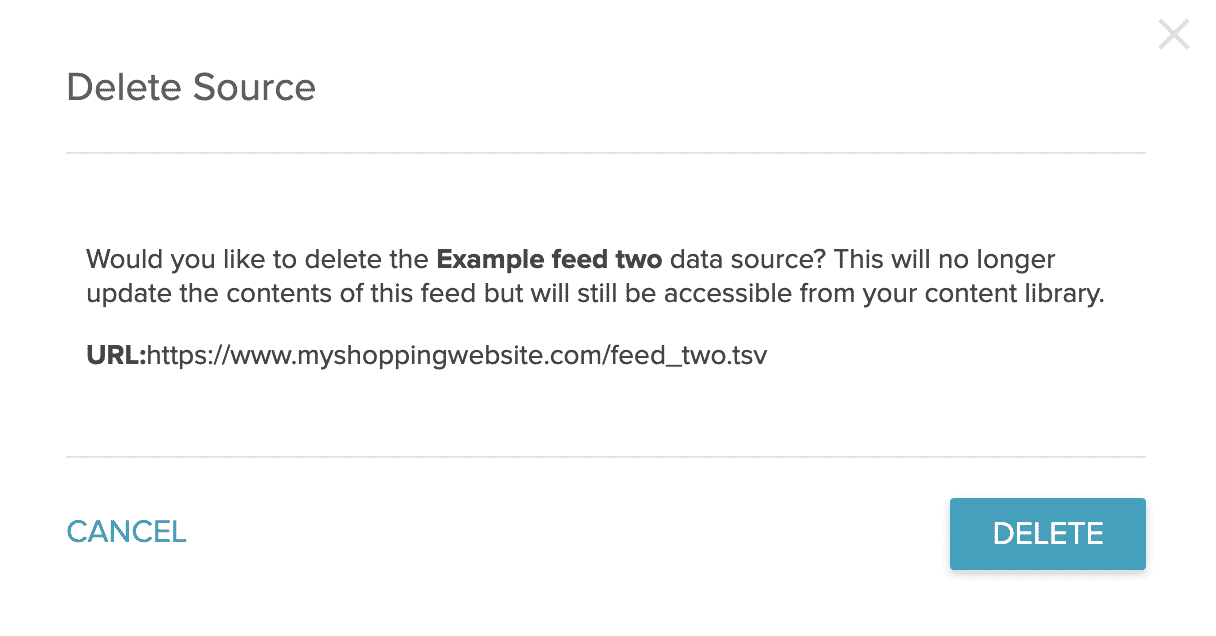
- After you click Delete, the source should disappear from the list.
Switching to Product Sync from the Content API or Javascript Spider
If you're currently using the Content API or Javascript Spider to get your content into Sailthru, you may consider switching to Google Product Sync, as a simpler and more reliable way to manage your content; allowing you to easily manage how your content is mapped to content fields. Hourly updates from Google Product Feed mean that content will be updated in close to realtime. If you're currently using the Content API or Javascript Spider, and would like to switch over to Google Product Sync, you'll need to discontinue using the Content API or Javascript Spider. First, we recommend first setting up your Google Product Feed in your test account, to confirm that your content is imported as expected, with all the content fields required for any business logic in your templates. If you'd like to switch across to Google Product Sync from the Content API or Javascript Spider, please reach out to your contact for support.How Tags and Vars Are Created / Mapped
Each product in your GPF has product attributes which we process and group into tags and/or vars on the content. These are any attributes that describe the product which helps with categorization and easy location. Some example product attributes that we map to tags and/or vars are:- Google product category
- Condition
- Color, size, and pattern
- Gender and age group
- Brand
- Product type
- Shipping options
Adding Custom Tags
Note: This step is completely optional. By adding more tags in your products, Personalization Engine will be able to better track and measure individual user interests.- Using the tool or the application that you use to generate your Google product feed, add a new key field called
sailthru_tags - Enter the additional tags you want to add for the product in the value field
- Each tag must use hyphens instead of spaces.
- If multiple tags are used, each tag must be separated by a comma.
- Your generated Google product feed file should create a field similar to the example below.
<?xml version="1.0" encoding="UTF-8"?>
<rss version="2.0">
 <channel xmlns:g="http://base.google.com/ns/1.0">
  <title><![CDATA[Google Shopping Feed for  https://www.myshoppingwebsite.com/.]]></title>
  <link>https://www.myshoppingwebsite.com/</link>
<item>
 <g:id><![CDATA[ST0000000000000000]]></g:id>
 <title><![CDATA[Some awesome product]]></title>
 <link><![CDATA[https://www.myshoppingwebsite.com/link-to-product]]></link>
 <g:price><![CDATA[11.2GBP]]></g:price>
 <description><![CDATA[Lorem ipsum dolor sit amet, consectetur adipiscing elit, sed do eiusmod tempor incididunt ut labore et dolore magna aliqua. Ut enim ad minim veniam, quis nostrud exercitation ullamco laboris nisi ut aliquip ex ea commodo consequat.]]></description>
<g:google_product_category><![CDATA[3618]]></g:google_product_category>
 <sailthru_tags><![CDATA[tag,custom-tag-with-dashes,single-dash]]></sailthru_tags>
</item>
</channel>
</rss>
id     title   description   google_product_category   sailthru_tags
000    bag     awesome bag      1347                   pricey,bag-tag,custom-bag
001    train   awesome train    2012                   expensive,custom-train
002    car     awesome car      2134                   luxury,custom-car
Duplicate URLs / Product Variants
Any products with the same URL/link will be merged into as a single product during Product Sync's import process, however unique variant information is still retained within the "variants" var. If all of your products have unique URLs then you can just read the first variant to retrieve this metadata. For example, to print the size of the product you can do this:{variant = first(content.vars.variants)}
{variant.size}{foreach content.vars.variants as variant}
{variant.size}
{/foreach}