Notification Handling
Overriding Sailthru Mobile’s default behavior.
These methods will give you the most control over how your application reacts to incoming push notifications.- If you want to work with the bundle data or collaborate with your app before posting a notification to the user.
- If you want to silently receive data from a push notification without posting any notification to the user whatsoever.
- If you want to action something before posting a notification, for example downloading something before telling the user there is new data available.
- If you want to take advantage of specific notification utilities above the default ones Sailthru Mobile provides.
- Or any combination of anything you can think of! It’s entirely up to you.
Customize the Appearance of a Push Notification
To customize the appearance or content of a notification, implement as manyNotificationCompat.Extenders as you like, and add them to Sailthru Mobile’s NotificationConfig.
Note that if any extenders are added, they will by default override Sailthru Mobile’s notification extender. If you’d like us to still do our default notification extension, you can manually re-extend using our SDK’s NotificationExtender
For example, if we wanted to change the title of push notifications with the custom field special_price, we could implement the following NotificationCompat.Extender:
Java
import com.sailthu.mobile.sdk.NotificationExtender;

class SaleNotificationExtender implements NotificationCompat.Extender {

  @Override
  public NotificationCompat.Builder extend(NotificationCompat.Builder builder) {
      Bundle bundle = builder.getExtras();
      Context context = builder.mContext;
      if(bundle.containsKey("special_price")) {
          builder.setContentTitle("SALE")
                 .setContentText(bundle.getString("alert"));
      } else {
          return builder.extend(new NotificationExtender());
      }

      return builder;
    }
}
Kotlin
import com.sailthu.mobile.sdk.NotificationExtender

internal class SaleNotificationExtender : NotificationCompat.Extender {
    fun extend(builder: NotificationCompat.Builder): NotificationCompat.Builder {
        val bundle: Bundle = builder.getExtras()
        val context: Context = builder.mContext
        if (bundle.containsKey("special_price")) {
            builder.setContentTitle("SALE")
                   .setContentText(bundle.getString("alert"))
        } else {
            return builder.extend(NotificationExtender())
        }
        return builder
    }
}NotificationConfig:
Java
public class MyApplication extends Application {
   @Override
   public void onCreate() {
     super.onCreate();

     SailthruMobile sailthruMobile = new SailthruMobile();
     sailthruMobile.startEngine(getApplicationContext(), "your sdk key");

     NotificationConfig notificationConfig = new NotificationConfig();
     notificationConfig.addNotificationExtender(new SaleNotificationExtender());
     sailthruMobile.setNotificationConfig(notificationConfig);
   }
 }
Kotlin
class MyApplication : Application() {
    fun onCreate() {
        super.onCreate()
        val sailthruMobile = SailthruMobile()
        sailthruMobile.startEngine(applicationContext, "your sdk key")
        val notificationConfig = NotificationConfig()
        notificationConfig.addNotificationExtender(SaleNotificationExtender())
        sailthruMobile.setNotificationConfig(notificationConfig)
    }
}NotificationCompat.Builder means you can change pretty much whatever you like about the style and content of the notification. Check out the official Android Notification documentation.
Note: Don’t set a PendingIntent using setContentIntent directly, as it’s defined by Sailthru Mobile so we can track opens properly. If you want to change the Intent to be executed when a notification is tapped, check the next section.
Customize the Notification Action
To direct users to an activity of your choosing, you can implement aContentIntentBuilder and set it using NotificationConfig.
Note: This ContentIntentBuilder will not be called when the notitication has a deep-link attached.
To extend the previous example, if we wanted to direct users to some activity SaleActivity when a notification has the custom field special_price defined we could create a new class implementing ContentIntentBuilder:
Java
import com.sailthru.mobile.sdk.interfaces.ContentIntentBuilder;

public class SaleContentIntentBuilder implements ContentIntentBuilder {
  @Nullable
  @Override
  public PendingIntent build(Context context, Bundle bundle) {
    if(bundle.containsKey("special_price")) {
      Intent intent = new Intent(context, SaleActivity.class);
      return PendingIntent.getActivity(context, 12345, intent, PendingIntent.FLAG_UPDATE_CURRENT);
    }

    // return null to keep the default behavior
    return null;
  }
}
Kotlin
import com.sailthru.mobile.sdk.interfaces.ContentIntentBuilder

class SaleContentIntentBuilder : ContentIntentBuilder {

    override fun build(context: Context?, bundle: Bundle): PendingIntent? {
        if (bundle.containsKey("special_price")) {
            val intent = Intent(context, SaleActivity::class.java)
            return PendingIntent.getActivity(context, 12345, intent, PendingIntent.FLAG_UPDATE_CURRENT)
        }

        // return null to keep the default behavior
        return null
    }
}NotificationConfig:
Java
public class MyApplication extends Application {
    @Override
    public void onCreate() {
        super.onCreate();

        SailthruMobile sailthruMobile = new SailthruMobile();
        sailthruMobile.startEngine(getApplicationContext(), "your sdk key");

        NotificationConfig notificationConfig = new NotificationConfig();
        notificationConfig.addNotificationExtender(new SaleNotificationExtender());
        notificationConfig.setContentIntentBuilder(new SaleContentIntentBuilder());
        sailthruMobile.setNotificationConfig(notificationConfig);
    }
}
Kotlin
class MyApplication : Application() {
    override fun onCreate() {
        super.onCreate()
        val sailthruMobile = SailthruMobile()
        sailthruMobile.startEngine(applicationContext, "your sdk key")
        val notificationConfig = NotificationConfig()
        notificationConfig.addNotificationExtender(SaleNotificationExtender())
        notificationConfig.setContentIntentBuilder(SaleContentIntentBuilder())
        sailthruMobile.setNotificationConfig(notificationConfig)
    }
}
Listen to Received or Tapped Notification
It’s easy to listen on when a notification was received and when a user has tapped the notification.- To listen for received notifications implement
NotificationReceivedListenerand add your listener usingaddNotificationReceivedListener. - To listen for tapped notifications implement
NotificationTappedListenerand add your listener usingaddNotificationReceivedListener.
Java
public class MyNotificationReceivedListener implements NotificationReceivedListener {
  private static final String TAG = "ReceivedLogger";
  @Override
  public void onNotificationReceived(Context context, Bundle bundle) {
    if(bundle.containsKey("special_price")) {
      Log.i(TAG, "Sale Notification received");
    }
  }
}

public class MyNotificationTappedListener implements NotificationTappedListener {
  private static final String TAG = "TappedLogger";
  @Override
  public void onNotificationTapped(Context context, Bundle bundle) {
    if(bundle.containsKey("special_price")) {
      Log.i(TAG, "Sale Notification tapped! That's a good push!");
    }
  }
}
Kotlin
class MyNotificationReceivedListener : NotificationReceivedListener {
    override fun onNotificationReceived(context: Context?, bundle: Bundle) {
        if (bundle.containsKey("special_price")) {
            Log.i(TAG, "Sale Notification received")
        }
    }

    companion object {
        private const val TAG = "ReceivedLogger"
    }
}

class MyNotificationTappedListener : NotificationTappedListener {
    override fun onNotificationTapped(context: Context?, bundle: Bundle) {
        if (bundle.containsKey("special_price")) {
            Log.i(TAG, "Sale Notification tapped! That's a good push!")
        }
    }

    companion object {
        private const val TAG = "TappedLogger"
    }
}SailthruMobile
Java
public class MyApplication extends Application {

    @Override
    public void onCreate() {
        super.onCreate();

        SailthruMobile sailthruMobile = new SailthruMobile();
        sailthruMobile.startEngine(getApplicationContext(), "your sdk key");

        sailthruMobile.addNotificationReceivedListener(new MyNotificationReceivedListener());
        sailthruMobile.addNotificationTappedListener(new MyNotificationTappedListener());
    }
}
Kotlin
class MyApplication : Application() {
    fun onCreate() {
        super.onCreate()
        val sailthruMobile = SailthruMobile()
        sailthruMobile.startEngine(applicationContext, "your sdk key")
    sailthruMobile.addNotificationReceivedListener(MyNotificationReceivedListener())
        sailthruMobile.addNotificationTappedListener(MyNotificationTappedListener())
    }
}_u.
Silent Push Notification
ImplementNotificationSilencer if you want to suppress any received notification from the user
- You can silence notifications from other providers
- or Receive a notification to start a special background service using a
NotificationReceivedListener
silent is present.
Java
class MyNotificationSilencer implements NotificationSilencer {
    @Override
    boolean isSilent(Context context, Bundle bundle) {
        return bundle.containsKey("silent");
    }
}
Kotlin
internal class MyNotificationSilencer : NotificationSilencer {
    override fun isSilent(context: Context?, bundle: Bundle): Boolean {
        return bundle.containsKey("silent")
    }
}notificationConfig.setSilencer(NotificationSilencer)
Java
public class MyApplication extends Application {

  @Override
  public void onCreate() {
    super.onCreate();

    SailthruMobile sailthruMobile = new SailthruMobile();
    sailthruMobile.startEngine(getApplicationContext(), "your sdk key");
    NotificationConfig notificationConfig = new NotificationConfig();
    notificationConfig.setSilencer(new MyNotificationSilencer());
    sailthruMobile.setNotificationConfig(notificationConfig);

  }
}
Kotlin
class MyApplication : Application() {
    override fun onCreate() {
        super.onCreate()
        val sailthruMobile = SailthruMobile()
        sailthruMobile.startEngine(applicationContext, "your sdk key")
        val notificationConfig = NotificationConfig()
        notificationConfig.setSilencer(MyNotificationSilencer())
        sailthruMobile.setNotificationConfig(notificationConfig)
    }
}
Bundle Data
On all customisations available the Bundle will contain all data that was attached to the push and can be used in building your notification.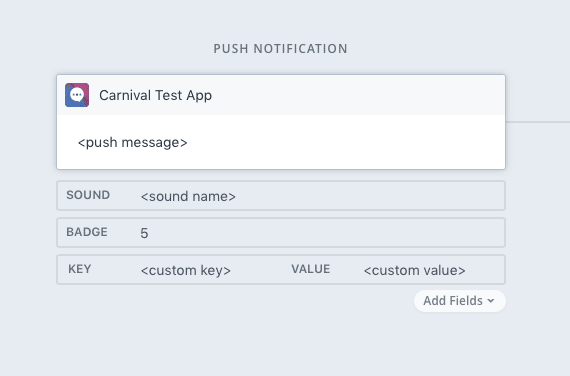 The above push notification would result in a bundle containing the following data:
{
  "alert": "<push message>",
  "badge": "5",
  "sound": "<sound name>",
  "<custom key>": "<custom value>"
}