Promotion Codes
Contents
When you want to avoid giving your discounts to everyone on the web, target your deals with single-use discount codes and Promotions.
Configure any Campaign or Template to automatically include one code per message once you add your promotion codes to the platform. Just follow the steps laid out below--each described in full detail on this page.- Export: Generate a list of single-use codes in your CMS and export to a CSV file. Your codes must be under 140 characters.
- Upload: Add the list of promotion codes to a Promotion you create.
- Send: Associate a Promotion with a campaign or a triggered template, and the system will dynamically insert one code per message wherever you insert the promotion Zephyr snippet.
- manually enter the coupon code into the message as text,
- display the code as part of an image, or
- use a Zephyr variable to show the same code to all recipients of a given campaign and change the value of the variable as needed (within the Setup section of the campaign's code) for future promotions.
Create and Send with a Promotion
To use promotion codes, you will need to create a Promotion to hold codes that you create in your external commerce system. You'll then specify the promotion in your template (for triggered sends) or campaign.Notes
- Campaigns are sent to seed emails before they're sent to a list. Make sure that you have enough promotion codes available for both.
- You'll need a promotion code available for your test send, or it will not display correctly.
- Your promotion codes must be under 140 characters.
Export Discount Codes from Your Commerce System
In your commerce platform, create a set of unique, single-use discount codes for your promotion. You will need to export those codes to a file and then import them. The import file must be a CSV with your codes under the header "code". Other columns can be present but will be ignored. Note: The file must be a true .csv file. Some programs default to csv utf-8 files. These will not upload. If you export multiple files, you will have the opportunity to add them simultaneously to the same Promotion. You can also add additional codes to a Promotion at any time. Note: If you are using Magento or Shopify, your exported CSV file will already be in a valid format and can be directly uploaded.Create a Promotion
- In the platform, under the Content menu, select Promotions. Here, you will be able to see an overview of what Promotions have already been created and how many available codes they have.
- Click New Promotion.
- Click the default Promotion Name to edit or replace it. You will use this name to reference the promotion in your templates or campaigns, as well as on the main Promotions interface.
- You can also add optional information about your promotion. If included, these fields can be pulled in to your template. This automation will allow you to switch between multiple promotions using a single template. You'll need to have added the proper Zephyr code to your template so that Promotions can be swapped in quickly and without additional coding.
- Click Upload File and select your CSV file or multiple files. Your selected file name(s) will appear in the detail page, however, these files are not yet saved to the promotion.
- Click Save. Any attached files will be processed and the codes will be added to the Promotion. Codes should be added within a minute, but if you need to check on their upload status, you can refer to the Jobs Status Page.
Set Up Refill Reminders
As part of creating a promotion, you can set a custom refill reminder. The reminder will email you when your promotion codes fall below your chosen level.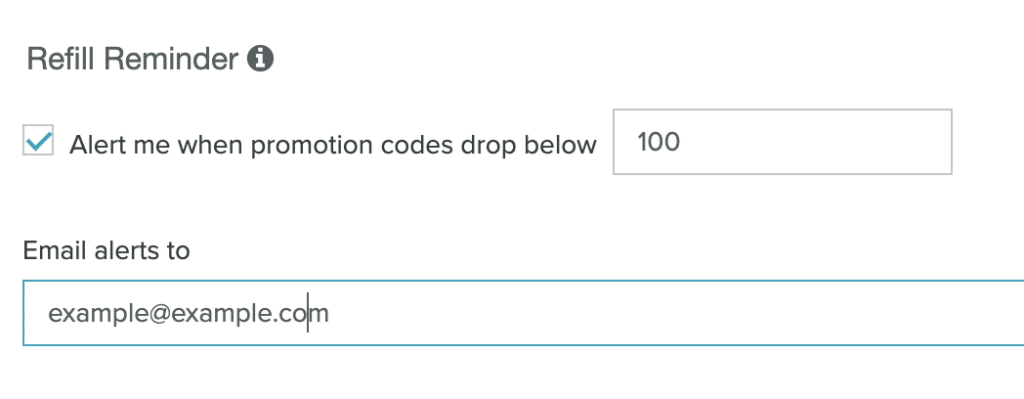
Enter the code threshold and one or more comma-separated email addresses for the alerts.
Using a Promotion in a Triggered Message and Campaign
To send a campaign or triggered message with a unique code, you need to select the promotion in the campaign or template's configuration, then identify the place to display the unique codes using Zephyr. The following sections will detail how to add Zephyr to your HTML in order to display a new code for each user.1. Select a Promotion
In a Template- In the platform, create a new template or navigate to an existing template.
- Open the Advanced tab. Locate the Promotions drop-down.
- Select the Promotion you created in the above steps.
- In the platform, create a new Visual Template or navigate to an existing Visual Template.
- Open the Settings Editor. In the General tab, locate the Promotion Codes section.

- Select the Promotion that you created in the above steps from the drop-down menu.
2. Display Unique Codes with Zephyr
If you have followed the instructions in the "Selecting A Promotion" section, your promotion and its associated codes are now linked to the sends. In order to display these codes, you will need help from our templating language, Zephyr. Coding a Promotion into Existing HTML Click the Settings Tab. Under the Advanced Tab, paste the following line.{promotion = promotion()}
In your template where you want to insert the promotion code, use the Zephyr {promotion.code}. For example:
<p>Use this code created just for you to save 25% off your next order!</p>
<p>{promotion.code}</p>
That's it! Schedule and send your campaign as normal. Fill up your promotion with codes and you are ready to start sending.
Optional: Apply Code to Site Session/Cart on Clickthrough
If you want a user who clicks a link in your email to have the unique code brought into their site session for display or for auto-application to their cart, you can automatically append it to each link URL in their email. On your site, you can then read this code from the URL's query parameter and use it in any way that you'd like. To accomplish appending the code as a query parameter on each link URL, you will need to add it to the auto-append feature. In your campaign's Settings tab, click the Advanced tab and then choose Link Setup. In the text field below the auto-append examples, enter a query string that includes the Zephyr value containing your code. Using the examples above, that would be{promotion.code}. For example:
code={promotion.code}