Build a User Management Page for Subscription Preferences and Opt-Outs
Contents
These are pages that users can access to edit their data and opt in and out of lists, or opt out of email or SMS completely. The policy is that unsubscribes are managed through the system, and the opt-out page is hosted. This page will help you learn more about our opt-out levels.
Since the platform manages your unsubscribes, a default opt-out page is created for you with each account.Page Requirements
- Must include options to switch to optout_basic or optout_all status.
- Form method must be set to post:
<form method="post"> - Once a user submits their options, they must be redirected to a confirmation page indicating that their request was successful. See Build a Thank You/Confirmation Page.
- When rendering a hosted page within an iframe, we recommend that the hosted page domain has the same domain as the website in order to avoid clickjacking. Verify your hosted page domain in the application (Settings > Setup > Domains). If you'd like to restrict using other websites that do not belong to your domain from rendering hosted pages in an iframe please contact Support.
- Link to the optout page in your template or campaign HTML using Zephyr syntax:
<p><a href="{optout_confirm_url}">Unsubscribe here</a></p>
- Checkboxes, radio buttons, and drop-downs for adding/removing a user from a list will be automatically checked if the user is a member of that list and unchecked if they are not (when the subscriber arrives on that page from an email).
- When a user unchecks a checkbox or radio button or selects "No" from a drop-down and clicks submit, they are removed from that list, and vice versa.
- All the options (template vs campaign optout) of the default optout page are only visible when the page is linked to from a message. The best method to preview them is to send a campaign to yourself on a test list.
Create A User Management Page
- From Content tab, select Hosted Pages. Then select the New Page button.
- The Name of the new page will be part of the URL, so name it something user-friendly. For Category, select "User Management."
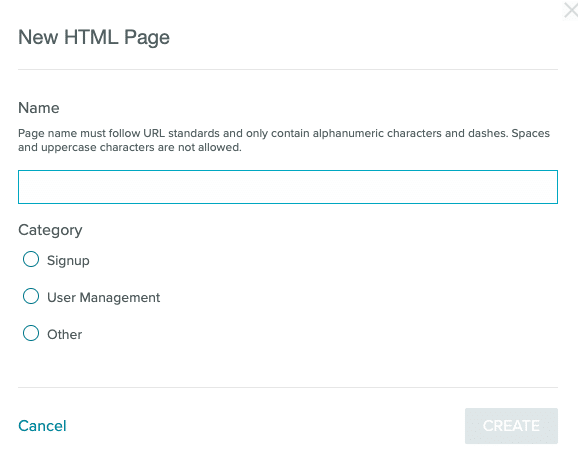
- Select Create to open the Hosted Page Builder.
- See the details in the subsections below for coding and configuring each aspect of the page. You can allow users to manage specific list subscriptions, triggered template optouts, and broader opt-out statuses.
Required
- You must include a form with the method set to "post". For example:
<form method="post">
...
</form>
- There must be a submit button.
<input type="submit" value="Button text goes here"/> - Per CAN-SPAM law, in addition to any other options, you must include the option to opt out of all email (optout_all status) or opt out of just campaign email (optout_basic). This is explained in the Opt-Out Status section.
- If you will surface Zephyr variable values in a hosted page, it is a best practice to escape any potential HTML characters. You can easily achieve this by wrapping any variable names in the h() function to html-encode these values. For example,
{h(brandName)}.
List Management
Allow subscribers to opt-in or opt-down by adding and removing them from specific natural lists which will receive specific campaign types (such as a particular newsletter). Note that the method described in this section adds or removes users from individual natural lists. If your company determines which campaigns a user should receive based on Smart Lists that are dependent on certain user profile values (for example 'all users where weekly=1'), you can instead set these profile values from your form. You may include two types of inputs on your form: radio buttons and/or checkboxes. Checkboxes will allow a user to select multiple lists within a given list group, whereas radio buttons only allow the user to make a single selection within a group. 1. Radio buttons must havename="listgroup[]" and value="". The value is the list name to which the user will be added. In the example below, DailySports is a list name. The listgroup determines whether the radio buttons are related. Those with the same listgroup value will be considered part of the same group. In any case, the user can only select one option from a given group.
In the example below, if the sports daily and weekly lists are both a part of listgroup[A]. The subscriber can select either daily or weekly, since only one radio button in a group can be selected at a time. But the subscriber can select a daily or weekly for both sports and fashion, since sports and fashion are in different listgroups.
<p>How often do you want to receive the Sports newsletter?</p>
<form method="post">
   <label><input type="radio" name="listgroup[A]" value="DailySports" />Every day</label>
   <label><input type="radio" name="listgroup[A]" value="WeeklySports"/>Once a week</label>
   <label><input type="radio" name="listgroup[A]" value="" />Do not send me the Sports newsletter</label>
</form>

<p>How often do you want to receive the Fashion newsletter?</p>
<form method="post">
   <label><input type="radio" name="listgroup[B]" value="DailyFashion" /> Every day</label>
   <label><input type="radio" name="listgroup[B]" value="WeeklyFashion"/>Once a week</label>
   <label><input type="radio" name="listgroup[B]" value="" />Do not send me the Fashion newsletter</label>
</form>name="lists[]". So if you wanted to give people the option to subscribe to any or all of the choices, you could do:
<p>Which newsletters would you like to receive?</p>
<form method="post">
   <label><input type="checkbox" name="lists[DailySports]" />Daily Sports newsletter</label>
   <label><input type="checkbox" name="lists[WeeklySports]" />Weekly Sports newsletter</label>
   <label><input type="checkbox" name="lists[DailyFashion]" />Daily Fashion newsletter</label>
   <label><input type="checkbox" name="lists[WeeklyFashion]" />Weekly Fashion newsletter</label>
</form><input type="hidden" name ="lists[List Name]" value="0" /><input type="submit" value="Button text goes here"/> Opt-Out Status
There are two values that represent opt-outs:.optout_basic
This opts the user out of all messages except triggered emails sent via templates you have designated "transactional". Transactional emails include password resets, purchase receipts, and shipping confirmations. This is the recommended status to assign to users who opt out. If a user is opted out using this option, their User Profile will show their status as Optout (Marketing)..optout_all
This opts the user out of all messages. This option will prevent the user from receiving any true transactional messages (such as password reset emails), which is whyoptout_basic is typically preferred. If a user is opted out using this option, their User Profile will show their status as Optout (All).
Note: You may see .optout_blast (Opt-out Blast) referenced in the documentation and the UI. This opt-out status was deprecated in 2018 and should not be used.
Add Opt-Out Options
In order to comply with spam laws and treat your users nicely, you must include an opt-out option that at least sets the user tooptout_basic status. You can offer an additional option that sets the user to optout_all. Generally, offering optout_all as the only option is not recommended as users will not receive any communication from you, including purchase receipts and password resets.
We recommend offering a button that applies the optout_basic status to the user. The code could look something like this:
<form action="" method="post">
  <input type="hidden" name=".optout_basic" value="1" />
  <input name="action" value="Do Not Send Me Marketing Messages" type="submit" />
</form>SMS Capture
Allow a user to opt-out of SMSSMS Consent
To align with TCPA (Telecommunications Protection Act) regulations, customers must obtain consent for transactional and marketing messages separately. Capturing consent cannot be tied to a single checkbox. The text must also contain explicit language around the use case the consent is tied to (e.g. "I would like to receive marketing messages." or "I would like to receive updates.")SMS Requirements
- An input field with
name="sms" - For marketing consent, a field with
name="sms_marketing_status"andvalue="opt-in" - For transactional consent, a field with
name="sms_transactional_status"andvalue="opt-in"
SMS Examples
Use the HTML examples to build an SMS capture page. Note: Non-US and non-Canadian profiles must enter "+[country code]" when submitting their SMS numbers to have their number captured and to receive messages. You may wish to add a reminder to your SMS signup page.SMS Number and Consent Capture
There are two ways to capture user consent in a form. Radio Button Example<form method="post">
<p>SMS: <input name="sms" type="text" /></p>
<p>Send Transactional SMS
<label><input type="radio" name="sms_transactional_status" value="opt-in" />Yes</label>
<label><input type="radio" name="sms_transactional_status" value="opt-out"/>No</label>
</p>
<p>Send Marketing SMS
<label><input type="radio" name="sms_marketing_status" value="opt-in" />Yes</label>
<label><input type="radio" name="sms_marketing_status" value="opt-out"/>No</label>
</p>
<input type="submit" value="Subscribe" />
</form><form method="post">
<p>SMS: <input name="sms" type="text" /></p>
<p>Send Transactional SMS
<select name="sms_transactional_status">
<option value="opt-in">Yes</option>
<option value="opt-out">No</option>
</select>
</p>
<p>Send Marketing SMS
<select name="sms_marketing_status">
<option value="opt-in">Yes</option>
<option value="opt-out">No</option>
</select>
</p>
<input type="submit" value="Subscribe" />
</form>Confirmation Page
After a user submits the form, you can choose for the user to be redirected to a hosted thank you/confirmation page or your own URL of choice. You can also use both options: redirect to a hosted page that then redirects to your own URL after a given number of seconds.Hosted Page
- If one does not already exist, create a hosted page of type Other as your Thank You/Confirmation page.
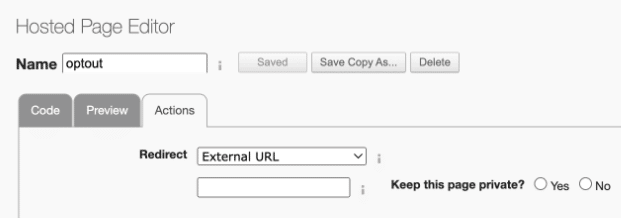
- When editing your User Management page, select the Actions tab.
- Next to Redirect, select the name of the Other page.
- When editing your User Management page, select the Actions tab.
- Next to Redirect, select External URL.
- Enter the URL in the box below.
Set a Page to Private
Setting a user management page to private adds an additional unique hash to the URL, which is required to access the page. This prevents an end user from changing the email address in the URL and accessing another user's page. To set a page to private:- Select the Actions tab.
- Select Yes next to Keep this page private?
- Save your page.
- Follow the linking instructions from the Domains and URLs for Hosted Pages documentation.
Edit the Opt-out Page
- Under Content, click Hosted Pages.
- If the page is 'locked' (displays a gold lock), then click the page name "opt-out." Otherwise click the wrench icon next to the "opt-out" page.
- Edit the HTML in the Code tab.
- In the Actions tab, select a page to redirect to from the Redirect dropdown. This page should thank the user once they have submitted the changes. (Make sure to create this 'thank you' page if you haven't already -- please see Build a Thank You/Confirmation Page.)