Add Users to Marigold Engage by Sailthru and Lists
Contents
When you import users, they typically start out on a Natural List of your choosing, but you can then add them to numerous lists based on any criteria you choose.
It is essential to plan the initial vars (data points) to include for your users. This data will be available for use by your template code and can be used in Audience Builder logic for organizing and segmenting users.
You can create Lists to organize users based on the vars associated with each user profile. For example, you may want to create a list of users who are due for subscription renewal to offer a discount if they refer a friend. Or you may want a list of all users so you can email a new product announcement. Adding users and all their variable (var) data allows you to manage them across lists and target your communications to the right users.
For more information on managing lists, see the Managing Lists Overview page. For more in depth information on choosing and adding vars see Setting Variables on Users.Methods for Adding, Updating, or Removing Users
You can add new users to a natural list, or update user data, the following ways:
Each method is described in the sections below. Unless you are using the User API, your first step is to create a new list or identify an existing list on which you want to add users.List File Upload
This method allows you to upload a file of comma-separated values (CSV), which can be exported from a spreadsheet or another system. The file will include an email column containing user email addresses, along with optional columns for vars containing data to associate with each user.
Notes:- The file must be a true .csv file. Some programs default to csv utf-8 files. These will not upload.
- This list creation method does not allow you to upload arrays. If you need to add arrays, use the list API.
Depending on the settings you will choose when uploading the file, you can add the users to a list, remove them from a list, opt them out of email campaign messaging, or opt them out of all mail. You can also choose how to handle included vars, for example, whether to overwrite those which already exist.
The basic parameters for the upload file:
- The first header in the first column must be email in all lowercase letters with no additional spaces or characters.
- The rest of the headers in the first row are used to set variable names (e.g. first_name, last_name, phone, postal_address).
- You can use nearly any variable names you like, however, there are some disallowed characters, and you may want to include some system-recommended variable names. For details, see Set Variables On Users.
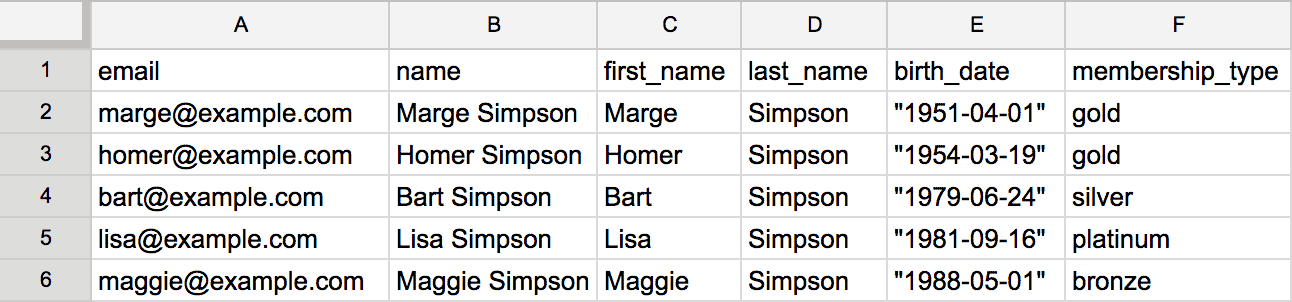
- The example below displays the required email column and custom/optional var name columns, with associated user data:
For further detail on specific variable parameters and recommendations, along with additional ways to manage variables, see Set Variables On Users. For further specifications on the file itself, see "File Types and Resctrictions" below.
Note: If email is unavailable, you can use thesid to import users for list file uploads.
Upload a User List
Once you have prepared your .csv or .txt file, follow the following instructions and options for uploading a list in My Sailthru. (Note that developers can also perform this operation using the Job API.)
1. Select a List- On the Lists page in My Sailthru, click the list name that you want to update. If you want to use a new list, create a new list, then click its name.
- Add To List adds all users in the .csv or .txt file to your list.
- Remove From List removes all users in the file from your list and can be used for list cleaning. Note that when you remove a user from a list please note that the user and their vars will remain in their user profile.
- Opt Out (Mass Mail) sets the statuses of all users in the file to Opt Out from blast or mass emails.
- Opt Out (All Mail) sets the statuses of all users in the file to Opt Out of all mail, including transactional triggered emails. Note that this function will not add users to the list you specified, it will just opt them out if they already exist in your database. In order to upload a list of opted-out users, use the Add to List function to create the list and then the Bulk Update feature of Audience Builder to opt out the entire list.
- Replace all uploaded vars to change the content of existing vars. The content of the uploaded file will overwrite existing vars in the system, updating the user profile.
- Replace only blank vars to update the content of vars that are currently unpopulated in the system.
- Replace only vars that do not exist will add any var that is not in the system. Vars that already exist will remain unchanged. Case sensitivity and spacing are important and must be consistent. If you have previously uploaded the var first_name and this upload contains the var First_Name, this is considered a new var and will be added to the user profile.
File Types and Restrictions
The file that you upload must adhere to the following requirements:
- Be UTF-8 if a text file. Use ASCII character set only
- .csv files must be one of the following MIME types: 'text/plain', 'text/csv', 'text/x-c', 'text/comma-separated-values', 'application/csv', 'application/excel', 'application/vnd.ms-excel', 'application/vnd.msexcel', 'text/anytext'.
- If you use Excel to edit the file, be sure to save it as a .csv file using the file format "Comma Separated Values." If you are using Google Sheets, from the File > Download menu, choose Comma-Separated Values.
- The maximum accepted file size is 2 GB. For larger files, split your list into segments and upload each file separately.
Add, Remove or Opt Out Users via Direct Input
At times you may want to add, remove or opt out a user manually by entering their address. It is important to note that you can not add vars for the user when submitting an address manually. Manual upload is typically used for adding test users.
From the Lists page in My Sailthru, you can manually add or remove users, opt user out of blasts (opt a user out from campaign emails but allow them to still receive transactional triggered 1:1 messages sent via API), or opt out users from all mail.
- On the Lists page in My Sailthru, click the list name that you want to update. If you want to use a new list, create a new list, then click its name.
- Click Add or delete users via direct input.
- In the Emails text field, add the email addresses, one per line.
- In the Action dropdown menu, select Add to List, Remove from List, Opt Out (mass mail), or Opt Out (all mail).
- Your email address will appear in the Send Report Email To field. You will receive an alert via email when these changes are applied.
- Click Submit.
Add Users from a Signup Form on Any Webpage
To signup users to a list from an external website with a provided HTML form, please see Add users Using Sign-up Form. You can embed an HTML form on any page, regardless of whether it is on the company's main domain.
Social Media Signups
You can also add users directly via Facebook Lead Ads or Twitter Lead Cards.
Add Users and Manage Lists via the API
It's recommended to use the API to capture ongoing signups and user data changes from your other systems.To add/update individual users and list memberships, use the User API. To bulk update users (e.g. sync an entire list CSV or database) use the Job API list_import call.
Create a New List
To create a new List, to which you can subsequently add users:
- In My Sailthru, from the Users tab, select Lists.
- Click the Create New List button. Give the new list a unique name and mark is as Primary or Secondary List. Primary Lists' growth or decline is tracked and should be used for your main list. Secondary Lists are used when you need to create an internal test list or a one-time use list that doesn't need to be tracked.
- For more information, see Managing Lists Overview
- Click Create List.
Add Users to a List
If you need to add or update users from external sources, on the List page, click the list's name, then choose one of three options for adding users to the list:- Add or delete users via list upload
- Add or delete users via direct input
- Add users via signup forms
- Use the User API
- Use Audience Builder